Figure 1
This document describes how to use the FLExTrans machine translation system. See section 12 for other documentation.
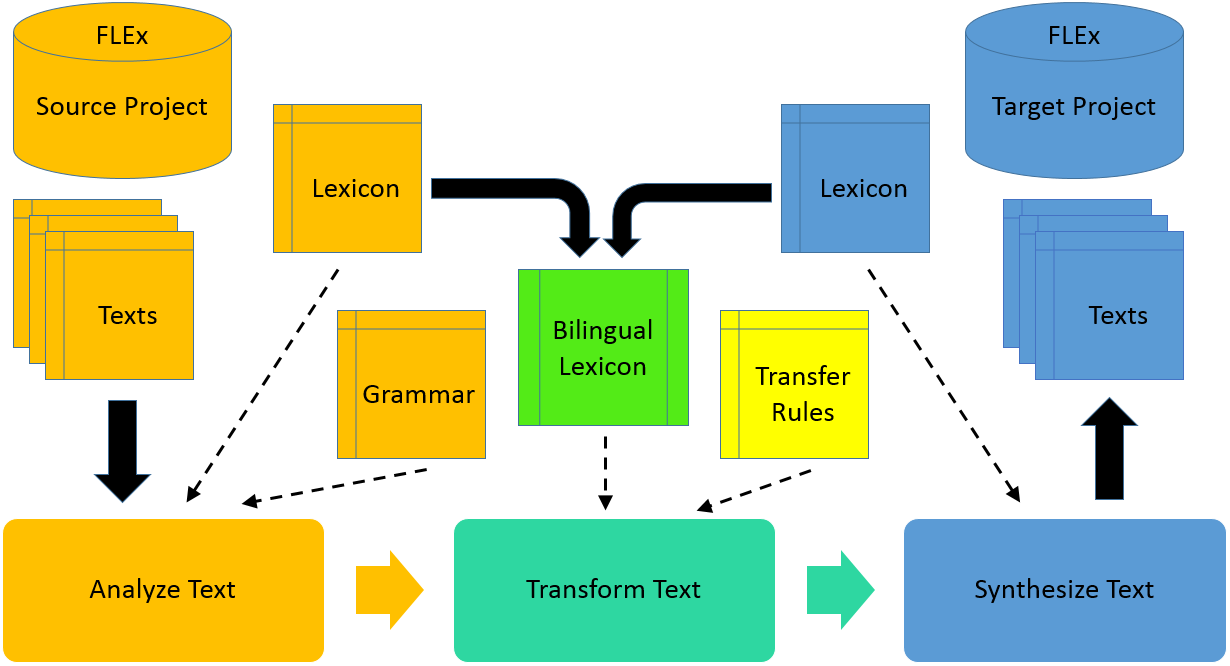
FLExTrans is a rule-based machine translation system. It was first developed in 2015 (Lockwood 2015). It marries the power of the Apertium (Apertium, 2021) transfer engine with the outstanding lexical model and usability of FLEx.
Figure 1
FLExTrans is composed basically of two language databases, a list of transfer rules and a series of programs that do the work. The language databases, one for the source language and one for the target language, are in the form of FLEx projects. A FLEx project stores, among other things, a lexicon, grammar settings and a database of texts. The transfer rules are in the form of a text file in XML format. The core programs are the analysis engine, the transfer engine and the synthesis engine. A text in the source language first goes through the analysis process where words are broken down into morphemes. Then the “analyzed” text is transformed into target morphemes and rearranged as necessary in the transfer process. Lastly, the target morphemes are put together into target words in the synthesis process. The end result is a text in the target language.
FLExTrans, as a program, consists of many different modules that are run within the FLExTools[1] program. Upon installation, FLExTools is populated with several collections of modules for common FLExTrans tasks.
After you have installed FLExTrans and performed some one-time preparatory steps on your source and target FLEx projects, the basic steps for machine translation with FLExTrans are as follows:
These steps only need to be performed once, when you are setting up your projects to be used with FLExTrans.
For the following steps, it is assumed that you have gone through the installation steps as given on the FLExTrans website and that you have confirmed that FLExTrans works for the sample projects. Be sure that the FLEx projects for your source and target languages are on your machine and can be opened by FLEx.
The following steps will prepare your FLEx projects, as well as the FLExTrans setup for your specific pair of languages.
 button and choose your source database, i.e. FLEx project. If you did the installation test, instead of "Choose Project", it will show the most recently used source project
 before you click on it.
| Setting | Change to |
|---|---|
| Source Text Name | The title of the text you want to translate (from the lists of texts in the source FLEx project). |
| Target Project | The name of your target FLEx project (from the list of FLEx projects). |
The modules related to synthesis (writing out lexicon files, preparing the text, running synthesis) need to know if you are using the XAmple parsing model or the HermitCrab parsing model in your Target Project for synthesizing target morphemes into surface forms. For more details on the HermitCrab parser, see Black, (2014).
By default FLExTrans assumes you will use the XAmple parsing model. To set up FLExTrans for HermitCrab parsing, you need to do the following things:
If you have any lexical entries that have a space in the Lexeme Form, do the following in your FLEx projects:
The HermitCrab synthesis tool will use #s internally for spaces.
There are certain steps that are not strictly necessary for FLEx, but they are needed for FLExTrans. In your FLEx projects:
If you expect to write rules that use more than a few of the categories, attributes, and template slots in your FLEx projects, there is a module that can get those into your transfer rules file before beginning. (Find out more about this tool in section 4.5. Find more about transfer rules in section 6.)
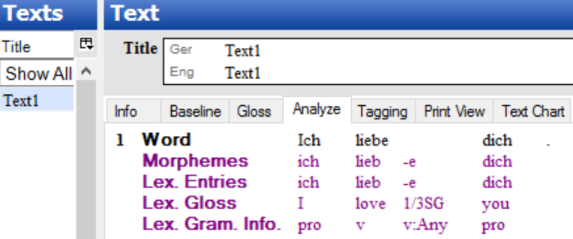
Word glosses, word categories and free translations are not necessary. A fully analyzed text will look something like (5) below.
Note: Word gloss and category are hidden as well as free translation.
Now you have senses linked from the source project to the target. You haven’t created anything in the target project yet, but you have done the preparatory work.
In this section, as an exercise, we are going to write a simple rule that removes affixes from words of a certain category. We’ll modify an existing rule to do this.
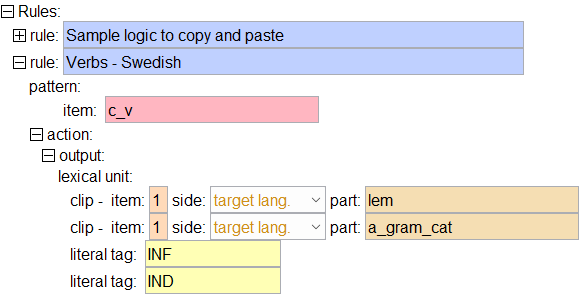
In brief what this rule does is set up an action to take place when a word is processed by the Apertium engine that has the “n” tag. (Every word coming from FLEx has the word’s grammatical category in the form of a tag. It’s always the first tag.)
The action that we execute is to strip off any affixes from the word. This is accomplished by outputting the word itself -- the “lem” part and the grammatical category -- anything that matches a tag specified by in the “a_gram_cat” attribute. No other tags (affixes) are explicitly outputted. The target lang. attribute of the clip elements in (10) above is selected so the target word that corresponds to the input source word is outputted.
See sections “A Tutorial on Writing Transfer Rules” and “Transfer Rule How To’s” for more information on transfer rules. The authoritative reference document for transfer rules is found in section 3.5 and appendix 3 of Forcada et al. (2010).
You can see the results by opening the target FLEx project. Go to the Texts & Words area and verify that a new text has been inserted. (Sometimes it takes a moment before it appears.)
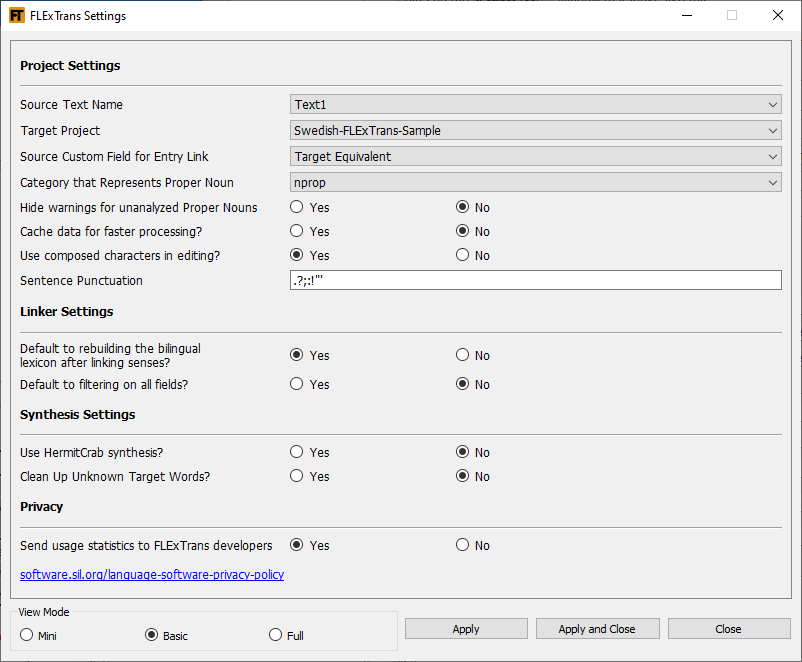
The FLExTrans User Interface presents modules that can be run to perform various operations. These are organized into collections. There is a menu that allows adjusting settings for the modules.
The FLExTrans user interface is shown in (14). The parts of this window are described below.
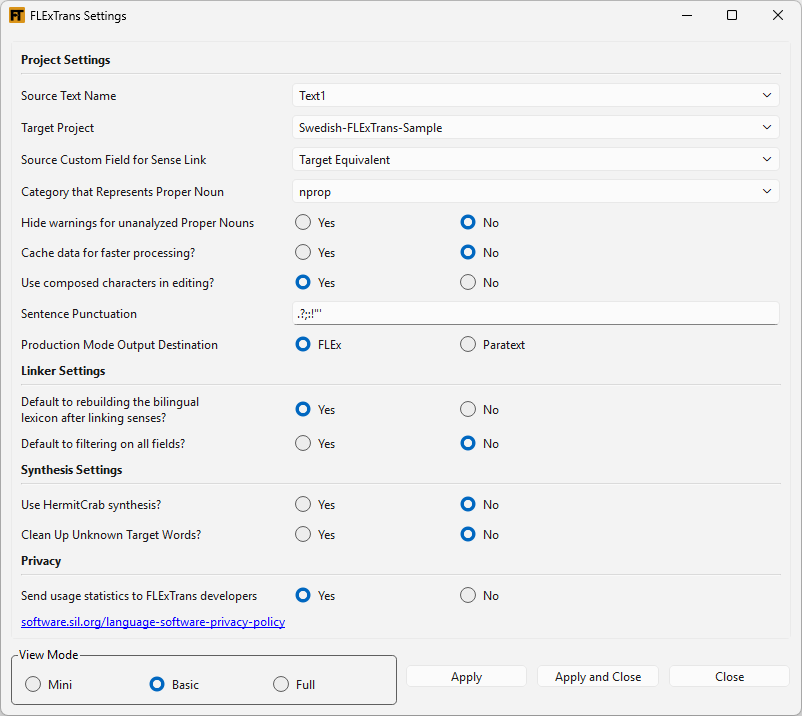
The FLExTrans Settings provide a way to configure various details needed for FLExTrans. You launch the FLExTrans Settings by selecting FLExTrans > Settings from the FLExTools main menu. Hover over a text box or Browse button to get an explanation of the setting. For file or folder names in the FLExTrans Settings, you can change the file to be used by simply typing the changes in the pertinent text box. The Basic View Mode is seen here; other options are Mini and Full.
Most of the tasks in FLExTrans are accomplished by running several modules. To make it easier to find the modules needed for larger tasks, collections provide a way to see only a subset of the available modules, presented in a set sequence. Modules can be in more than one collection.
To change to a different collection, click the desired tab just below the toolbar buttons.
To manage collections, select Manage Collections from the FLExTools menu.
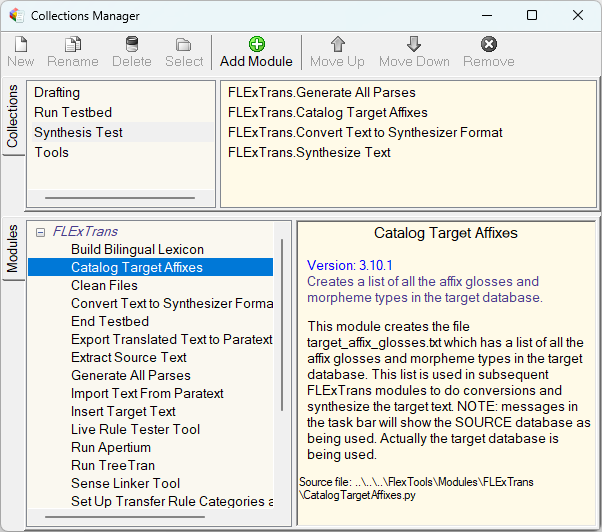
This will bring up the Collections Manager, as shown in (16)
In the upper left pane is a list of the currently defined collections. The upper right pane shows all the modules that are in the currently selected collection. The lower left pane shows all possible modules in FLExTrans. If a module is selected in this pane, the lower right pane will provide information about that module.
If you want to make your own collection to hold modules that you frequently run together, use the  button to create a new collection. Select a module in the lower left pane and use the
  button to add it to your collection. Use the
  and
and  buttons to change the sequence.
When you are finished making your collection, click the Select button on the toolbar.
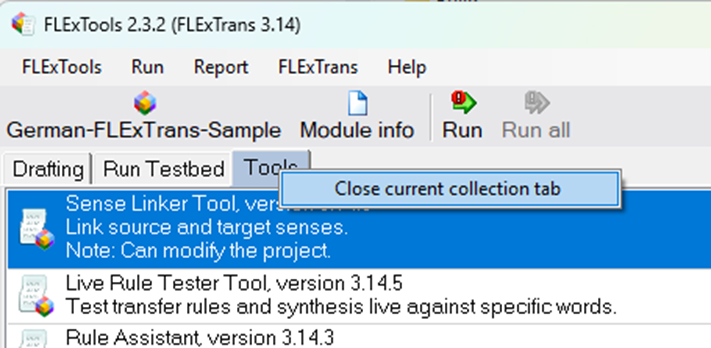
To remove a collection from the main display, right-click on the collection name, as seen below:
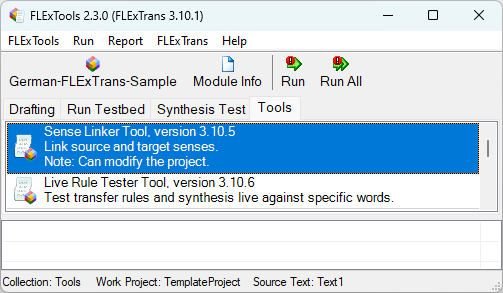
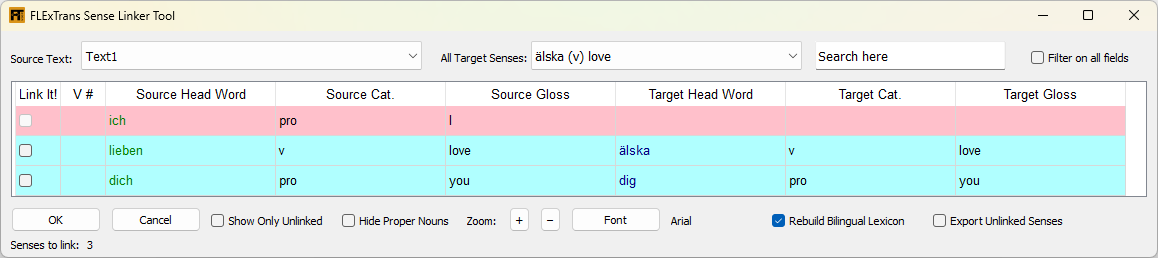
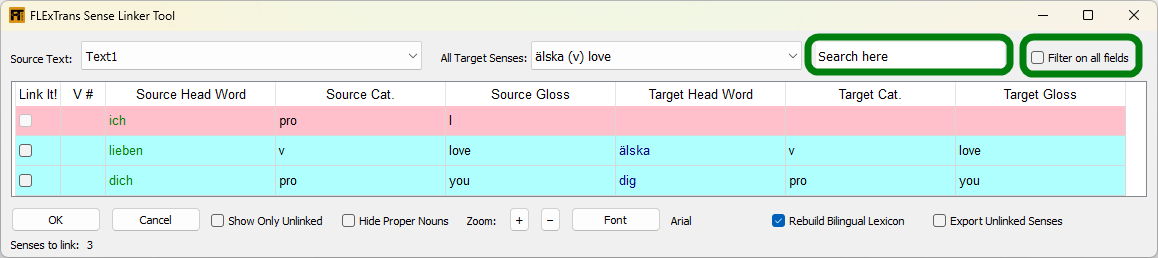
The Sense Linker Tool is a tool for linking source senses to target senses. The tool looks through the text specified in the settings and lists each and every sense that was analyzed in that text in order. Here’s a sample screen shot of the Sense Linker Tool:
Here’s a key to the color coding:
| Color | |
|---|---|
| White | Source sense has been linked to a target sense. |
| Red | Source sense has not been linked to a target sense. |
| Very Light Blue | A target sense has been suggested for this source sense through a partial match of the glosses. |
| Light Blue | A target sense has been suggested for this source sense through an exact match of the glosses. |
| Green | The target sense has been set or changed for this source sense. |
| Red Text | There is a mismatch of grammatical category even though the glosses match. |
| Green Text | Source headwords |
| Blue Text | Target headwords |
For suggested sense links (colored in blue shades), if you want to link them, simply check the check box in the Link It column.
To link a source sense with a target sense where there is no suggestion or to change an existing link, you need to do two things. First, select the target sense that you want to link to in the drop down list of All Target Senses then go to the Target Head Word column for the source sense in question and double-click there. The target sense information should appear with a green background color. You can use the search text box to find the appropriate target sense.
If you want to work on linking senses for a different source text, click the Source Text drop-down box and select the desired text. At this point, the Sense Linker Tool will close and restart.
Use the Search here field to find a sense. This will find senses in the list by matching the beginning of the headwords in the list. If you want to filter the target sense list to those matching part of a headword or the gloss or the part of speech (using parentheses), click on the Filter on all fields check box and then type in the Search here box. Note: if you want the Filter on all fields check box to be checked by default every time, there's a setting for that. Change the Default to filtering on all fields? to Yes in the Linker Settings section of the FLExTrans Settings.
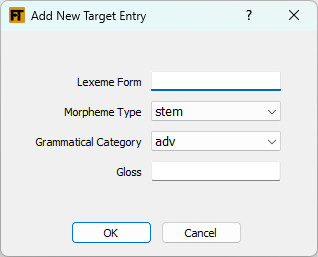
At times you may realize the target sense that you want to link to is not yet in the target lexicon. You can click on the Add Entry button to bring up the dialog shown in (19) to add the basic information about the new entry and sense. Once you click OK, the new entry/sense gets added to the Target Sense List and gets selected and now you can use it for linking. Note that the new sense will always be sense number one. If you need to merge the sense into another entry, use the merge capability in FLEx. If you do such a merge, the link you have established remains valid since FLExTrans links directly to the sense regardless of where it is.
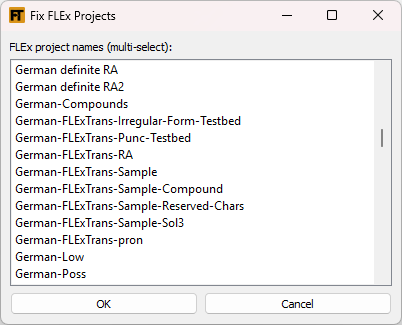
This function supports cluster projects. See (35).
If you only want to see the senses that need to be linked, check the box Show Only Unlinked.
If you want to hide proper nouns, which you may not want to bother linking, (especially if the form is the same in both languages) click the box Hide Proper Nouns.
Quickly change the font size with the plus and minus buttons next to Zoom. Change all aspects of the font with the Font button.
After finishing sense linking, sooner or later you need to rebuild the bilingual lexicon. If the Rebuild the Bilingual Lexicon check box is checked, this will happen automatically when you click OK. If you would like to change whether by default this box is checked or unchecked when you start the Sense Linker Tool, set the corresponding setting in the FLExTrans Settings.
Use this check box to export a list of unlinked senses to a file (after clicking OK) that may be useful when asking a colleague to provide the correct target words for the given source word. The results pane will tell you where the file is and its name. The file is in HTML format. To save it as a file that a colleague can edit, open it in a word processor (e.g., Word or LibreOffice) and save it as a document. After the colleague returns the completed file, it may be necessary to create new FLEx entries and use the Sense Linker Tool. If Proper nouns don't need to be included, check the box Hide Proper Nouns before exporting.
At the bottom left the number of senses left to link is shown. Note that this is not necessarily the number of unchecked boxes, rather the number of unique senses that are remaining to link.
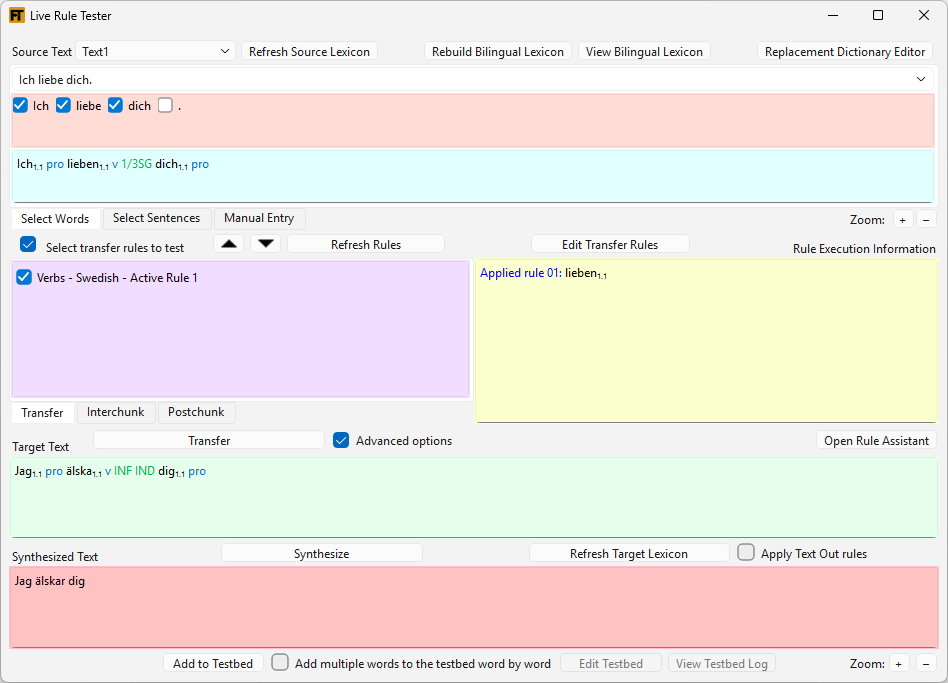
The Live Rule Tester Tool is a tool that allows you to test source words or sentences live against transfer rules. This tool is especially helpful for finding out why transfer rules not are doing what you expect them to do. You can zero in on the problem by selecting just one source word and applying the pertinent transfer rule. In this way you don’t have to run the whole system against the whole text file and all transfer rules. Here’s sample screen shot of the Live Rule Tester Tool:
Here’s a quick guide on using the Live Rule Tester Tool.
If you want to work on a different source text, click the Source Text drop-down box and select the desired text. At this point, the Live Rule Tester Tool will close and restart.
When you are in the Select Words tab in the top pane, you can hover over a word to see what the bilingual lexicon entry looks like for that word. As shown in the image above when you hover over the word ‘liebe’, use see that the bilingual lexicon maps ‘lieben’ to ‘älska’. This feature can be very useful when inflection features are present on the target word. These will show in the pop-up as well. If you have used “The Replacement Dictionary Editor”, you may see multiple mappings in the pop-up image.
By default the transfer rules file, the bilingual lexicon file and the source text are loaded according to the FLExTrans Settings. If you want to rebuild the bilingual lexicon, perhaps after changing something in a lexicon, click the Rebuild Bilingual Lexicon button.
You may have noticed that there is a Manual Entry tab for the source text words. You can enter words (technically word-senses) directly in plain text data stream format[16]. This might be useful if you want to test a word-sense that isn’t in a given text.
The Interchunk and Postchunk tabs are for use in testing rules using the advanced Apertium transfer engine.
You can’t edit the transfer rules in the Live Rule Tester Tool and even when you change the order of the rules in the tool that doesn’t change your transfer rules file. Make your changes in the XMLmind XML Editor. You can launch the editor by clicking on the Edit Transfer Rules button. To reload the transfer rules after you have changed them, click on the Refresh Rules button.
Move a rule up or down by clicking on it and clicking the up or down arrow buttons. Moving the rules in the Live Rule Tester Tool will not affect the order of the rules in the transfer rules file, and is only possible here for testing purposes. Note that rules are run in the order that they are listed, both in the Live Rule Tester Tool and when the transfer rules file is in use.
The View Bilingual Lexicon will start the XMLmind XML Editor for viewing the bilingual lexicon. The Replacement Dictionary Editor button will start the Replacement Dictionary Editor module.
If you change the target lexicon, click the Refresh Target Lexicon button to reload it so that upon synthesis, FLExTrans uses the changed target lexicon.
There is a check box that says Add multiple words to the testbed word by word. Use this when you want to add multiple one-word translations to the testbed in batch. This is useful, for example, if you have a "sentence" that runs through a paradigm. When you click Add to Testbed, FLExTrans will add each individual word and its corresponding synthesis to the Testbed in one go. Each pair will be its own test.
The Open Rule Assistant button will launch the Rule Assistant and the test data shown in it will be from the source text that is currently shown in the Live Rule Tester Tool.
The Trace HermitCrab synthesis check box, when checked before clicking the Synthesize button, will bring up a web page showing trace information. This may be helpful when trying to troubleshoot why some morphemes are not synthesizing correctly. This check box will only be visible if you have already indicated you want to use HermitCrab synthesis in the FLExTrans Settings.
The Apply Text Out rules check box, when checked before clicking the Synthesize button, will execute all of the search/replace rules you have defined with the Text Out Rules module. These will be applied before showing the result in the Synthesis Text box. This check box will only be visible if you have already added some rules via the Text Out Rules module.
The Do not clean up unknown words check box, when checked before clicking the Synthesize button, will prevent the synthesis process from removing symbols around synthesized words that indicate a word didn't synthesize. For example, %0%bilar% will not get cleaned up to be bilar. For production use of FT it is often helpful to do this clean up for words that you don't expect to synthesize, but for troubleshooting synthesis issues, it is helpful to see any problems. Otherwise, these problems may lie hidden. This check box will only be visible if you have already selected Yes for the Clean Up Unknown Target Words setting in the FLExTrans Settings.
The View Source/Target Apertium Text Tool is a tool that allows you to view the Apertium source or target files in an easy-to-read manner. You may not need to examine the Apertium files source_text-aper.txt or target_text-aper.txt very often, but sometimes you may find it useful to see what got extracted from the source FLEx project into source_text.txt or to see what the transfer rules produced after running the RunApertium module in the form of target_text.txt. Run this tool to see the contents of these files. (22) shows what the tool looks like. The actual file contents look like (23).
You have the options of changing the font, increasing the zoom level, displaying the text right-to-left or opening a similar view in the default web browser. If you click on the Target button, you will see the contents of target_text.txt.
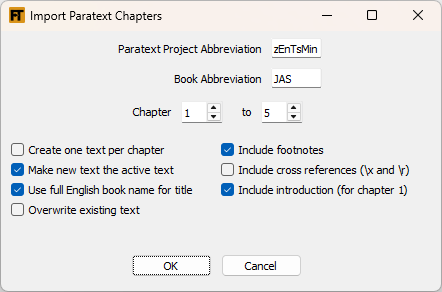
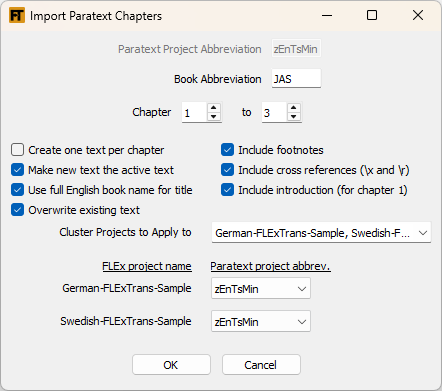
To import Paratext chapters into the source FLEx project, use the Import Text From Paratext module. Fill out the Paratext project abbreviation in the first box. Note: this must be a project that you are at least an Observer on in Paratext.
Also, you cannot import from Paratext resources. Put the Paratext book abbreviation in the second box. Select from and to chapters.
After importing, you will have a new text in the source FLEx project. It will be named something like the following: John 03-04. Note: if a text with that name already exists, you will get a text with the same name with '- Copy' appended, unless you have checked the Overwrite existing text box.
Additional options are the following:
This module supports cluster projects. See (37).
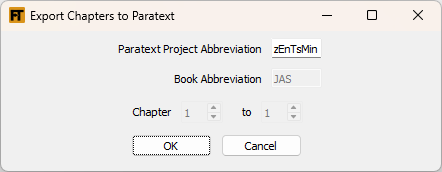
There are two tools that help you export to Paratext. The difference between them is where you want to export your text from.
To export chapters to Paratext from the newly synthesized text, use this tool. It is designed to work well with a text that you have previously imported with the Import Text From Paratext module and translated. The export tool expects the name of the active source text to be in the form John 03-04 or JHN 03-04. Use the FLExTrans Settings if you need to change the active source text. Export FLExTrans Draft to Paratext will find the book and chapters in the given Paratext project and replace the text that was there with the text created by FLExTrans.[3] Note: the Paratext project must be a project that you are at least a Translator on. Also, the Paratext book must already exist.
Normally this module should be run after the Synthesize Text module.
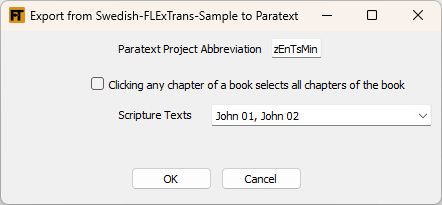
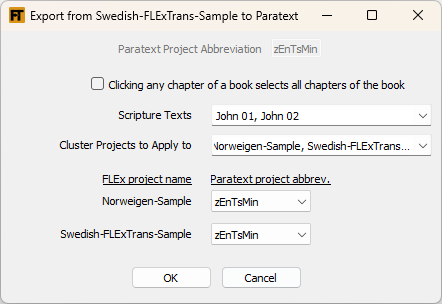
To export chapters to Paratext from a FLEx project, use this tool. It is designed to work well with a text that you have previously inserted into the target FLEx project with the Insert Target Text tool. Export Text from Target FLEx to Paratext will find all scripture texts in FLEx and will show you the filtered list of texts. It looks for texts with names in the format John 03-04 or JHN 01. You can select multiple texts to be exported. Also, if you want to export all chapters for a book, first check the box that says: Clicking any chapter of a book selects all chapters of the book. Then when you click one of the book's chapters in the Scripture Texts list, all chapters will get selected.
Note: the Paratext project must be a project that you are at least a Translator on. Also, the Paratext book must already exist.
This module supports cluster projects. See (36).
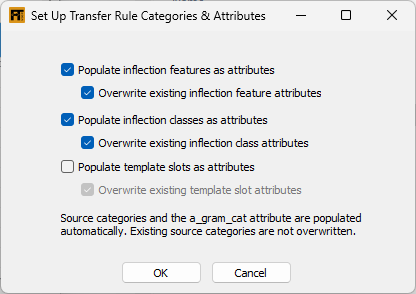
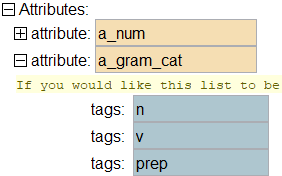
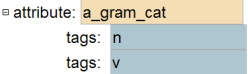
The Set Up Transfer Rule Categories and Attributes Tool will populate categories and attributes in your transfer rule file. Use this tool when you are first setting up your transfer rules. You are given a choice for populating attributes as shown in (27). Source categories & the a_gram_cat attribute are always processed.
This tool finds all the grammatical categories in the source FLEx project and creates corresponding categories under the Categories element in the transfer rule file. Source categories will always be created with this tool, unless an existing category of the same name is found.
This tool that will put the necessary attribute values for grammatical categories into your transfer rules file. Every transfer rule will likely need to reference the grammatical category of a word either in the source or target language. The initial transfer rules file that comes with FLExTrans has just a few sample grammatical categories. This tool will take the categories that are in the source and target FLEx projects and insert them as tags under the specific attribute called a_gram_cat in the transfer rules file. The list of grammatical categories will be a complete list of all the unique categories in both projects.
(28) shows what the a_gram_cat attribute might look like after running this tool.
Click the appropriate check box as shown in (27) to populate attributes in your transfer rules that correspond to the inflection features in both of your FLEx projects. Click the overwrite check box to change existing attributes in your transfer rule file with the inflection features from the FLEx projects.
Click the appropriate check box as shown in (27) to populate attributes in your transfer rules that correspond to the inflection classes in both of your FLEx projects. Click the overwrite check box to change existing attributes in your transfer rule file with the inflection classes from the FLEx projects.
Click the appropriate check box as shown in (27) to populate attributes in your transfer rules that correspond to template slots in both of your FLEx projects. Click the overwrite check box to change existing attributes in your transfer rule file with the template slots from the FLEx projects.
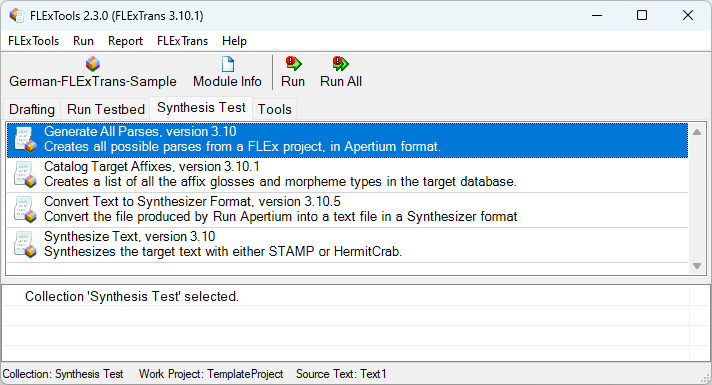
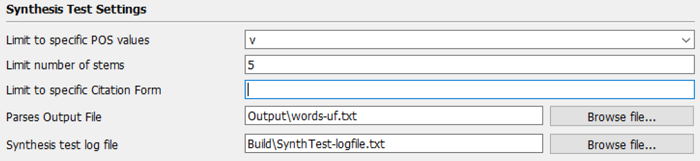
The Generate All Parses Tool provides a way to test whether your Target Project is ready for the Synthesis stage of FLExTrans. It allows you to choose a specific inflectional template from your Target FLEx project and generate all possible forms that are allowed by that template. This allows you to review the forms to ensure they are all valid forms. If not, that is an indication of further work needed on the morphological description in the Target FLEx project. It does not attempt to generate forms for any category without a template, and it does not attempt to generate with derivational affixes.
The output can be limited to a specific part of speech, a certain number of roots, and/or a specific Citation Form. It is a good idea to limit the output when starting out, because it can easily become quite large. If you have not set any POS values in the setting Limit to Specific POS Values, there will be an error message.
To adjust the settings for the Synthesis Test,
Note that for this test, any active template must have at least one affix in each of its slots. If you have any slots with no affixes in them, it is recommended to set that template to "inactive" for this test. (Untick the box labeled "Active" in the description of the template in Category Edit in FLEx.)
To use this tool, change to the Synthesis Test collection. This will bring up the standard FLExTrans modules that are needed for synthesis, plus the Generate All Parses module, as shown in (29).
To run the Synthesis Test:
If you wish to try this module out on the Swedish sample project, use the settings to limit the POS to Noun (n), since that is the only category with a template in this project. When you run it, the output will overgenerate. That is, it will create forms that are not valid forms in Swedish. However, this is a good example of what the output will look like when you have started setting up your template, but have not yet added all the constraints (such as Inflection Features or Inflection Classes) that will fine tune the output.
There are various reasons synthesis may fail or may generate incorrect parses. Below are a few debugging steps, but there are many more possible causes.
Although having a thorough parser setup is not necessary to use a project for synthesis, having at least some of it working provides a really good start for synthesis. See Black, (2014) for more details about setting up parsing effectively for either parser.
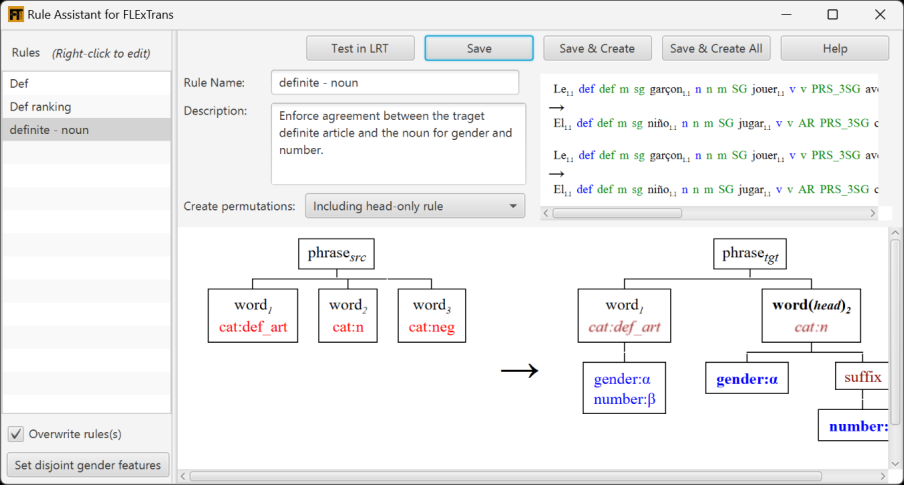
The Rule Assistant helps you write Apertium transfer rules for common situations such as agreement in a phrase. It can help for the following situations:
For enforcing agreement between phrase constituents you must assign the appropriate feature in FLEx to the affixes or stems involved.
For detailed help on using the Rule Assistant, consult the help file the comes with the Rule Assistant. You can get to this help file by clicking on the Help button, then on User Documentation.
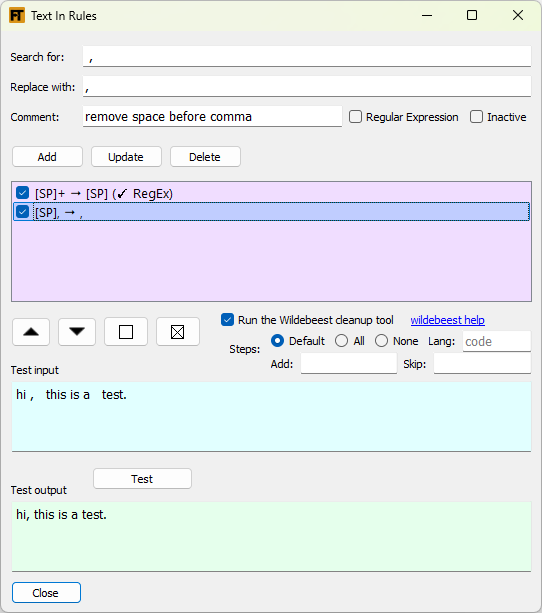
The Text In Rules Tool helps you test a set of search and replace operations to be used to fix up the text that comes out of Paratext. Regular expressions can be used if desired.
All the active rules defined in this tool are used in the Import Text From Paratext module. The newly imported text in FLEx will have the changes applied. This is very helpful for those situations where you may not have editing permission of the Paratext text, but some cleanup of the text is needed.
The rules defined in this tool are run sequentially with the output of one rule being the input for the next one. Use the up and down arrow buttons to change the order of the rules. The two buttons next to the arrow buttons will select or unselect all the rules for testing.
The interface is pretty self explanatory. To edit a rule first click on it in the list, make your changes and then click the Update button. You will see the edited form now in the list.
If the search and replace lines are Regular Expressions, check the Regular Expression check box. See the FLEx help on how to use Regular Expressions or various websites that explain the Regular Expression language.
Use the Test button to check that your rules are doing what you expect.
The Text Out Rules Tool helps you test a set of search and replace operations to be used to fix up the text that comes out of the Synthesize Text module. It basically is identical to the Text In Rules Tool, except it is used in a different part of the FLExTrans process, namely the end of the process. The rules created here are distinct from the other rules. Use this tool to make any changes to the translated text before you bring it into another tool like FLEx or Paratext.
When the Insert Target Text or Export FLExTrans Draft to Paratext module is run, Text Out rules are automatically applied[4].
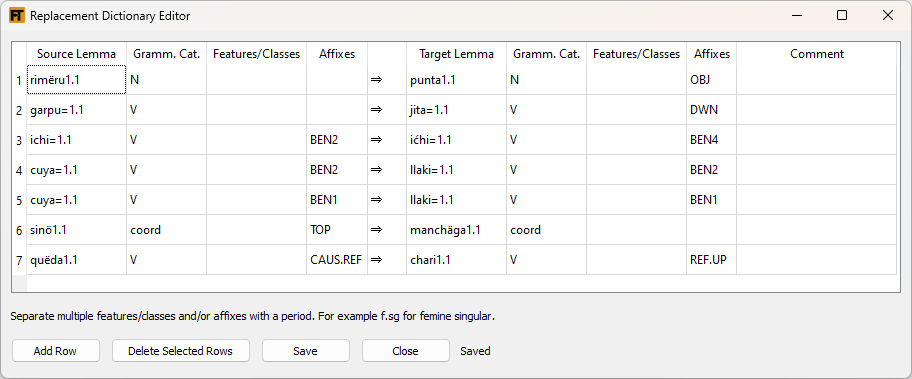
The Replacement Dictionary Editor allows you to link source senses in certain inflections to target senses that are different than the normal link for the sense. Likewise you can link certain uninflected source senses to inflected target senses that are different than the normal link. For example, in the last line of (33) you can see that quëda1.1 with the affixes CAUS and REF is linked to chari1.1 with affixes REF and UP. Whereas normally, quëda1.1 (uninflected or in other inflections) links to kïda1.1. In line 1 you can see an OBJ affix is added to the target word rimëru1.1 is linked to. In line 6 you can see an affix is removed from the target word that sinö1.1 is linked to. (These last two examples could be done with a very specific transfer rule, but making the change at the lexical transfer level makes good sense.)
The rows that are listed in this tool augment the bilingual lexicon. If the source information in a row is exactly the same as the default bilingual lexicon entry, this replacement dictionary entry will override the default entry.
The buttons for the tool are pretty self-explanatory. When editing or adding information, start typing in the Lemma cell and a list will appear as you type. Tab or click elsewhere to have the tool automatically fill in the grammatical category and/or features and classes.
The information displayed in this tool is stored in a replacement dictionary file typically called replace.dix.
FLExTrans works great in cluster projects. You can leverage the approval of an interlinear text in the source language to produce translations of the text in multiple target languages.
FLExTrans supports cluster projects by allowing you to define which FLEx projects - both source and targets - are in your cluster. You do this in the FLExTrans Settings. See (34). This information is used in various tools to allow you to apply the tool to multiple FLEx projects at once.
See tool images below that show support for cluster projects. (35) shows the Add New Entry window that is launched from the Sense Linker Tool.
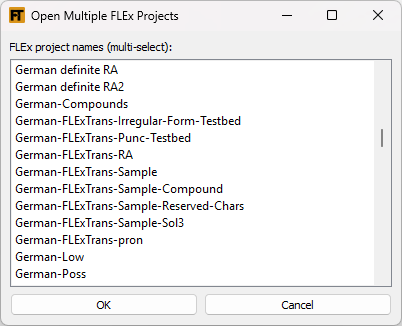
This tool allows you to open FLEx projects you choose.
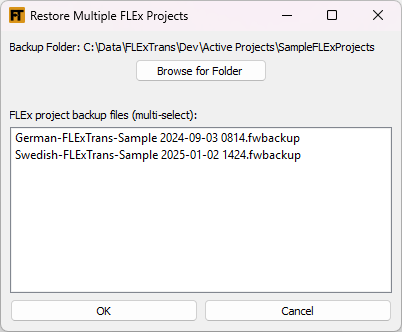
This tool allows you to restore FLEx projects you choose.
This tool allows you to run the Find and Fix utility on the projects you choose. This is the same utility that is available in FLEx. You cannot run this utility on a project that is currently open in FLEx or on the current source project even if it is not open. Fixed errors are logged to the report pane.
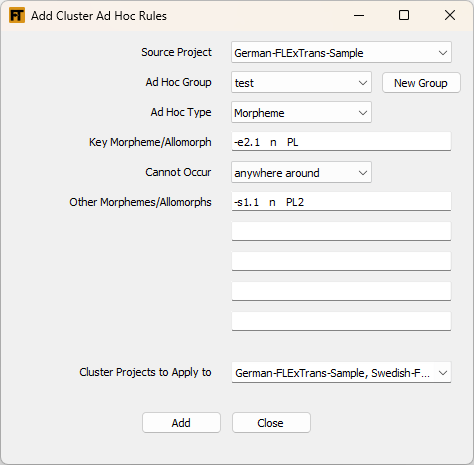
This tool allows you to add an ad hoc constraint to multiple cluster projects.
Writing transfer rules is not as tricky as it might seem. People generally understand the basic concepts, but they sometimes struggle with the formalism. Maybe one of the reasons people struggle is that the formalism mixes declarative and procedural statements. This tutorial should help you get used to writing transfer rules.
Here’s a brief overview:
Before starting, it is important to get an idea of what we can’t do, before explaining what we can.
Think bottom up, not top down. Start with a detailed question like “How can I deal with the source language having possession indicated on nouns, but the target language having possession indicated on verbs?” not “How can I change SOV order to SVO order?”
We don’t want to confuse the roles of lexical transfer and structural transfer. There is a grey area between the two, but there are also big parts that don’t overlap.
A rule-of-thumb is, if the rule applies to all words in a category, it probably wants to be treated in the structural transfer; if it applies to just part of those words, then maybe it needs to be dealt with in the lexical transfer.
Lexical transfer for a three word lexicon looks like (42). In other words, the bilingual dictionary maps a source word to target word. In FLExTrans you don’t normally need to examine the bilingual dictionary, but conceptually it looks like this. Open the bilingual.dix in the XML Mind editor for the details.
| (42) |
|
The output of the structural transfer would look like (43).
| (43) |
|
When you are in the structural transfer stage, you have access to both the source and target sides.
This isn’t critical information that you have to know, but gives insight into what’s going on. Feel free to skip this section.
Given an input lexical unit shown in (44):
| (44) |
|
If we have the following in the bilingual dictionary:
Which gives the following mapping in terms of lexical units:
| (46) |
|
We will get this target-language output from the lexical-transfer module:
| (47) |
|
Note that the target-language lexical form, as defined in the bilingual dictionary entry in (45), is produced by replacing two tags on the source side (i.e. cat1 aff2) with one tag on the target side (i.e. cat1).
Important: any source language tags not matched in the bilingual dictionary entry are copied into the output on the target language side. In our example, aff3 in (44) gets copied to the final output in (47).
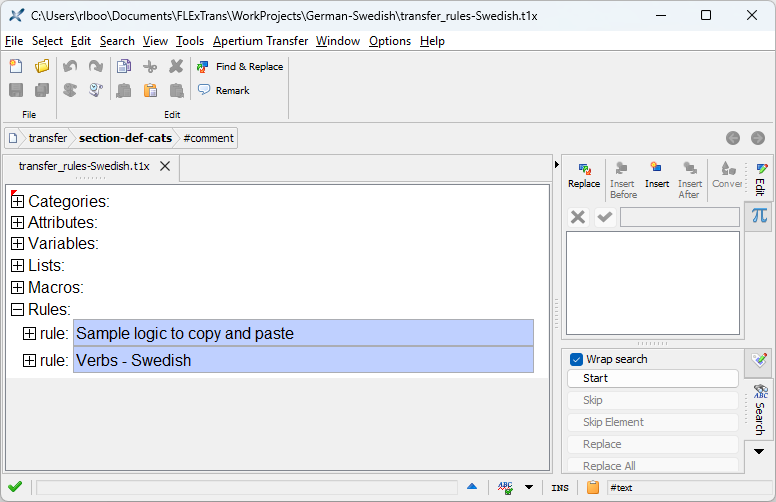
The transfer rule file is written in an XML format and in FLExTrans it is named transfer_rules.t1x[6]. We could do all the editing of the transfer rules in a text editor, but by using the structured editor XMLmind XML Editor we not only get a graphical user interface, but also verification that the rule file we are writing is valid. In fact the XMLmind XML Editor and the add-ons for FLExTrans make it hard to write an invalid rule file.
It’s hard to give a step-by-step overview of what a transfer file looks like because there is quite a lot of obligatory parts that need to go into even the most basic file. But, it’s important to get a general view before we go into the details. Here is an example in which I’m deliberately not going to use linguistic names for the different parts to try and avoid assumptions.
You should see this same thing when you open the file transfer_rules.t1x (FLExTrans Documentation\Transfer Rules Tutorial\Croatian-English folder) in the XMLmind XML Editor. (Expand all the elements.)
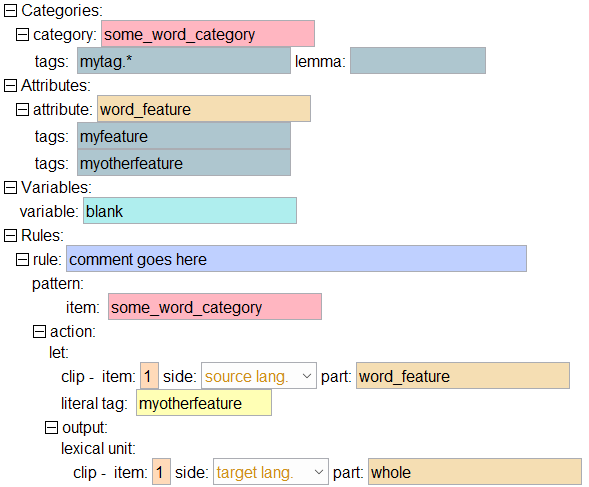
The transfer file is divided into two main parts: a declaration section and a rules section. The rules section uses information from the declaration section. In fact, every kind of reference you make in the rules section, you have to declare in the declaration section. The rules section is clearly denoted by the element Rules. All of the elements above Rules are part of the declaration section. In (48) a minimal amount of declarations are shown, namely the Categories, Attributes, and Variables elements. (The elements Lists and Macros are not shown.)
Rules have two main parts: the pattern definition and the actions to be carried out.
The pattern element is what determines if Apertium runs the rule or not. If the input word or words match the pattern, Apertium will run the rule. The thing that goes in the item sub-element of the pattern element is a list of one or more categories (from the declaration section) you want to match.
The action element contains the steps you want to perform in the rule, generally ending with an output element where you output lexical units into the data stream. Note how declared attributes are used in the action element. Categories and attributes are discussed more below.
Rules are applied when a pattern is matched in the source language input data stream. Which patterns are matched in which order goes like this: the longest patterns are attempted first and then successive shorter patterns are attempted. When there is more than one pattern of the same length, the pattern that comes first in the file is attempted first followed by the rest in order.
Patterns do not overlap. Once a pattern is matched, the matched words are processed and not considered again for any other patterns. In other words, the source language words are processed sequentially in chunks. Cf. “How does pattern matching work?”.
| (49) |
|
Let’s do an exercise where the goal is to turn a sentence in Croatian into English. The input and desired output is shown in (49).
For the purposes of this example, we are going to use some prepared data. We have a Croatian text that is already analyzed and we have small Croatian and English lexicons with all of the entries and senses that we need.
Let’s see what our input and output looks like initially if we run the system. Our input of course, according to (49) is: Otišla si tiho i bez pozdrava.
You should see:
| (50) |
|
Clearly we have some work to do, but at least three words look good. (50) is what we get using straight lexical transfer. In other words, English word-senses are substituted for Croatian word-senses. The sample transfer rule we are using (shown in (48)) is having no influence during the transfer process.
Let’s look at the input and output in data stream format.
| (51) |
|
Let’s think about what changes we need to make in order to convert the output shown in (51) into an adequate form for target language synthesis. NB: If we want to change information, it’s a procedure; if we want to output information or not output information, it’s a declaration.
So, what order do we do these in? Well it doesn’t really matter. An experienced FLExTrans linguist would probably do it in two steps, but for pedagogical purposes, we’re going to split it up into five steps:
Here is what the input and output data stream of each of the above steps will look like:
| (52) |
|
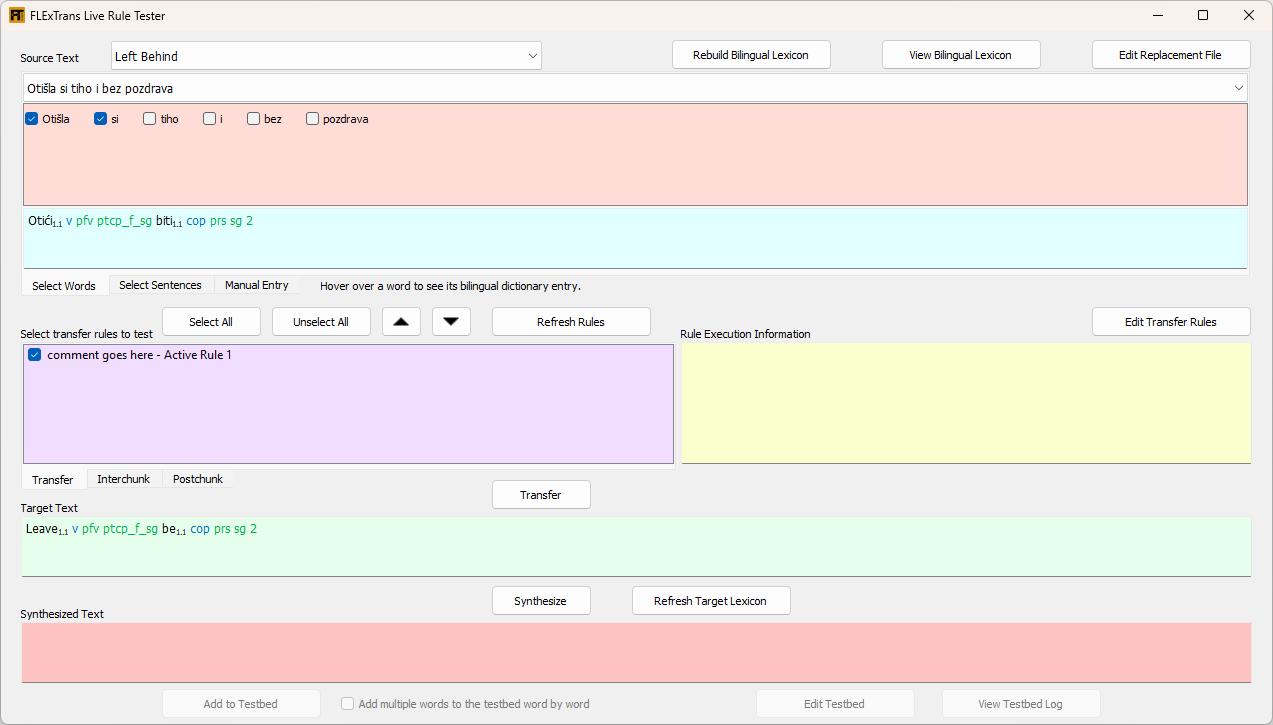
Let’s see what data stream output we get for the first two words right now. To do this we will use the Live Rule Tester Tool which is a great tool for applying a single rule to one or more words and checking the result. See section 4.2.
Your Live Rule Tester Tool should look like this:
In the blue box, in the lower section of the Source Text area, we have the input data stream for the first two (checked) Croatian words:
| (54) |
|
This matches what we have in the cheat sheet in (52).
In the green box, in the Target Text area, we have the output data stream after the sample rule is applied.
| (55) |
|
Since we haven’t done anything, it doesn’t yet match our output goal for step one in the cheat sheet.
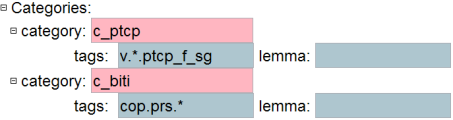
Define the categories we need in transfer_rules.t1x. Replace the dummy Categories element with:
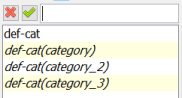
You may be wondering how you get a new category element inserted. It is straightforward:
 button (upper right side) or press Ctrl-J.
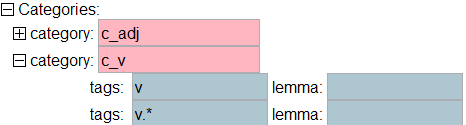
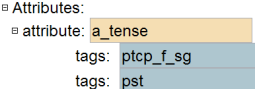
Why do we need .* in the tags elements? This is because of how the matching system for categories works. In the middle of tag sequences, a * is counted as a single tag. At the end, it is counted as any sequence of tags. So, what we have is v followed by any tag, followed by ptcp_f_sg.
Note: we are using the convention of starting all categories with “c_”.
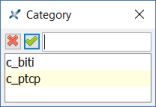
Trick: Click in the pink area of the item element and press F11. You will get a list of possible categories that can be used in this element. The list looks like (59).
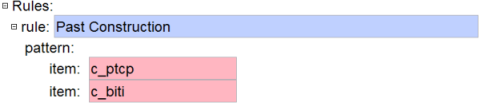
By using this pattern we will detect a participle followed by the auxiliary. Once detected, the rule will run.
Notice that the example rule as written outputs only the first among two lexical units as seen in (60) (“item: 1” means the first item or word). We are not outputting the 2nd word. The result is that our biti1.1 word will disappear.
The result is:
| (61) |
|
Great!
The result is:
| (65) |
|
Excellent!
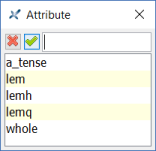
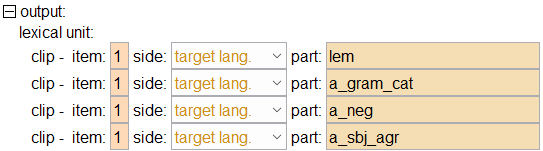
So far we have been outputting the whole target language lexical unit, as seen in (67) below.
An important thing to know about lexical transfer is that any source language tags not matched in the bilingual dictionary are copied into the output on the target language side. In our case, pfv pst are the tags that get copied from source to target because, in the bilingual dictionary (bilingual.dix), otići1.1 v maps to leave1.1 v. All we need is the pst tag; we don’t need the pfv tag, so we need to declare that it should not be outputted.
The result is:
| (69) |
|
Woo! What just happened was that we magically deleted the unwanted pfv tag by not specifying that we wanted it. Tag deletion is thus not stated as tag deletion (tag → 0), but by not declaring it.
Now we should have a lexical form for “leave” which we can synthesize. Let’s give it a go. Click the Synthesize button.
In the red box you should see:
| (70) |
|
And if you click on the rest of the check boxes to select all of the Croatian words and click the Transfer and Synthesize buttons again you should see:
| (71) |
|
This looks a lot better than our initial results in (50). The word Left is now there correctly. It’s beyond the scope of this exercise to explain in detail how the synthesis works in this case, but the tag pst matches the feature pst on the variant form of the verb leave. See section 8.3.4 for more details.
We’re getting there, now let’s move on to the next step.
To recap, the input we’ve been working with is:
| (72) |
|
And our current output is:
| (73) |
|
What we now need to do is take the information from the (not outputted) verb biti “be” and use it to output a personal pronoun before the verb. Remember that when we do not output something we are not deleting it. It is still there in the input, we are just choosing not to put it in the output.
The pronoun that we want to output looks like (74). If we get it in this form, it will synthesize into the word you.
| (74) |
|
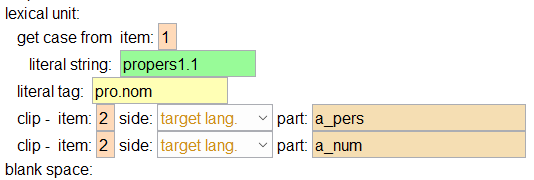
Important: We need to remember to output the 1.1 after the word and not just propers. Even though in the target FLEx project the lexeme form is propers, FLExTrans automatically adds the homograph number (1 because it’s the first and only homograph) and the sense number (1 because it’s the first sense). If we mistakenly use propers instead of propers1.1, the word won’t synthesize because FLExTrans won’t find propers in its internal dictionary. This use of x.x after the word helps FLExTrans identify each unique sense in the dictionary.
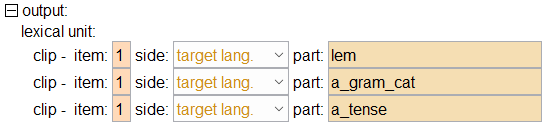
You can do an Insert Before... and choose lu(lexical_unit_lit-string) then click on the literal string, do an Insert After... and choose lit-tag(literal_tag). The blank space element comes after and is indented at the same level as lexical unit.
The lexical unit statement means we are outputting a word[11]. The literal string element outputs the given string of characters, and the literal tag element outputs a tag sequence[12]. Multiple tags are separated by a period, so in this case we are outputting two tags: pro and nom. The blank space element outputs a single space character.Click on the literal tag element and Insert After... and choose clip(clip_target_language). Do this twice.
Note that we are “clipping” (copying a part of a string which matches a pattern) from position 2, i.e. the verb “be”. To be clearer, the first clip statement in (77) makes a copy of the part of the lexical unit in position 2, on the target language side, which matches one of the patterns defined in the attribute element “a_pers” (which can be either 1, 2 or 3). If we look at the lexical transfer output which is internally coming from the bilingual dictionary for position 2, this will become clearer:| (78) |
|
The result is:
| (79) |
|
Select all the Croatian words, do Transfer and Synthesize and see what our English sentence looks like.
Now we get:
| (80) |
|
We get the second person singular pronoun that we wanted, but this is not totally satisfying because you should be capitalized and Left should not be. Let’s fix that.
 button (upper right side) or press Ctrl-Shift-T.
Transfer and Synthesize again.
Now we get:
| (83) |
|
Looking good!
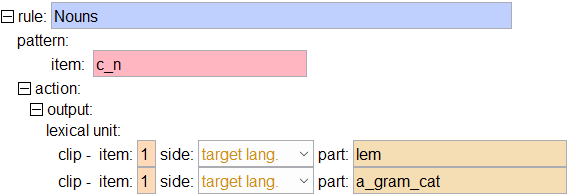
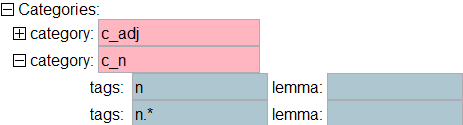
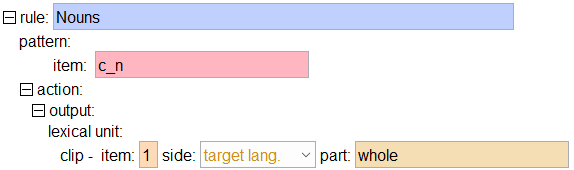
The last remaining thing to do is to not output the genitive or singular tags on the noun. We’re going to have to make a whole new rule to match nouns.
Now test it in the Live Rule Tester Tool, but this time check only the Croatian word pozdrava. Note: if you refresh the rules, the new Nouns rule will not automatically get checked in the rule list. Check the box for the new rule before testing it.
Starting with:
| (88) |
|
The result is:
| (89) |
|
And if we Synthesize we get:
| (90) |
|
Close the Live Rule Tester Tool and run the modules in the Drafting to see what our English sentence looks like.
Now we get:
| (91) |
|
Success!
Step 6 is left as an exercise for the reader. Change the noun rule to output an indefinite article before the noun. You can do this by following the instructions for adding the pronoun, see “Step 4”. The string you need to output is a1.1 indf.
You can find the solution transfer file called solution.t1x in the FLExTrans\WorkProjects\Croatian-English folder.
You may think this was a lot of work to translate one sentence from Croatian to English, but consider the fact that now every Croatian past tense construction that occurs in a text will correctly be translated to English and every indefinite noun will also be handled.
Here are some tips for best practices when writing rules.
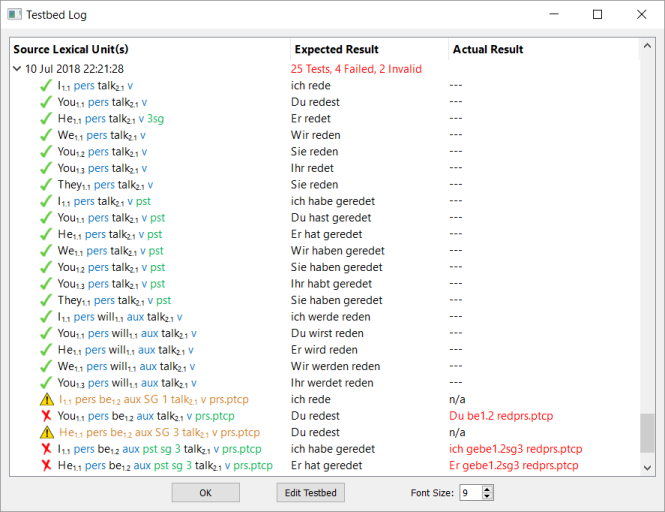
The FLExTrans Testbed is a system designed to help you maintain the quality of your translations. It not uncommon, as you add new transfer rules to the system or change the lexicons, you mess up the results you were getting before. To help prevent this, it is very helpful to have a database of expected results for a certain inputs. This is called a testbed. After making significant changes to your translation system, you can re-run the testbed to make sure you are still getting the results you expect for words or sentences that you earlier deemed correct.
This is the way you normally work with the testbed:
FLExTrans has a collection of tools to help you maintain the testbed, run the testbed and see the results.
This module you will find in both the Tools and Run Testbed collections. Simply run the module and you will see a log of all the times the testbed has been run with a summary of the results. The most recently run test opens and lets you see the details for each test. Hover over the Source Lexical Units of a test to see some pop-up text of which FLEx source text the words came from. If the rule was invalid, the pop-up text will also tell you why FLExTrans found the test invalid.
This module you will find at the top of the Run Testbed collection. It initializes a test run and dumps all of the source lexical units in the testbed into the Analyzed Text Output as defined in the FLExTrans FLExTrans Settings (the default is thesource_text.txt file).
This module you will find as the next to last module in the Run Testbed collection. It takes the results of running the transfer and synthesis processes (the source_text.txt file) and adds the tests run and whether they passed or not to the testbed log.
The Live Rule Tester Tool is a good place to add new tests to the testbed. See “The Live Rule Tester Tool” for more details.
It’s easiest to add new tests to the testbed while in the Live Rule Tester Tool. If you need to edit or delete a test, edit the file testbed.xml in the project folder with the XMLmind XML Editor.
Important: if the glosses of any of your affixes have a period in them, you refer to them replacing the period with an underscore. For example, 3s.S becomes 3s_S.
You generally refer to an affix using the clip element in your transfer rules. The part attribute of the clip element references an attribute usually and this attribute consists of potential tags which can be features or affix glosses.
If you are comparing a clip element to see if it matches an affix, you should use the literal tag element and write the gloss there. Remember the period-underscore substitution above.
Lexical categories are used to group words together. The grouping can be very broad such as verbs or very specific such as pronouns with feminine suffixes. The categories are used in the pattern matching system of transfer rules.
(93) is an example of a lexical category for indefinite nominals. The period indicates where a new tag begins. The asterisk is a wildcard indicator. It means that anything can fill that position. An asterisk at the end of the item matches one or more final tags. For example, if I have the lexical unit book1.1 n f sg, it could be precisely matched by a tags element containing n.f.sg. More generally we could match book with the tags element containing n.f.*. This would refer to all words that have the grammatical category n followed by the tag f followed by anything else, i.e. feminine nouns. (93) defines the set of all indefinite nouns — words that have the grammatical category n or n-irreg followed by ind and optionally something else afterward. Note that n.ind and n.ind.* are both necessary because n.ind.* would require some affix after ind and not match an indefinite noun like car1.1 n ind that has no additional suffixes.
If you use * in the middle of the tags definition, it means one or more tags occur in that position. For example, n.*.pl would match both n f pl and n ind f pl. Important: unlike the meaning of * in regular expressions, it never means zero occurrences. So, n.*.pl would not match n pl. To match this you would need an additional tags element n.pl to cover this case.
You can use the lemma element to identify a specific word-sense. (94) shows how the category dem_this can be defined as a word that has a grammatical category of dem and lemma this1.1 (in FLEx: headword this1 , sense 1). This might be useful when you want to match phrases containing the word this.
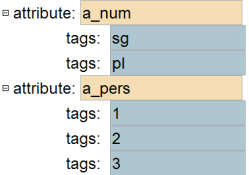
Attributes are defined in the rule file in order to identify possible values for word characteristics. An example is shown in (95).
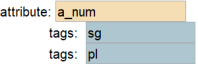
Certain words may have affixes that indicate grammatical number. (95) defines the possible values for the number attribute as being sg (singular) or pl (plural). Like lexical categories, these refer to tags in the data stream. Attributes are used within rules to get or set values.
The Apertium transfer engine searches for patterns in your source text. The patterns it searches for are those defined for each rule you have. Some patterns may be one word, some patterns may be multiple words. The transfer engine tries to match the longest patterns first and then progressively goes to shorter and shorter patterns. This means a five-word pattern would be used before a three-word pattern (assuming a set of words would match both patterns.) When there are multiple patterns of the same length, the first one listed gets precedence. This means in some cases the order of your rules will be important.
The transfer engine searches for matches in your words in sequential order starting with the first word. It will never find a match at some point in a text and then go back earlier in the text.
Another important concept is that the transfer engine processes words just once for whatever pattern is matched. After they are processed, the words are not examined again for any other matches. In other words, patterns cannot apply in an overlapping manner. For example, if you only have two rules, one that matches determiner-noun and another one that matches noun-adjective, when a phrase of the form determiner-noun-adjective is processed, the engine uses the rule that is listed first and then discards the adjective as there is no rule that matches this alone, and then the engine continues on to other words. The second rule does not get applied to that phrase. Another way to describe it is to say that the engine processes words in distinct chunks.
If the Apertium transfer engine finds a match, it runs the action part of your rule. If the engine finds no match for a word, it does default translation of it according to what is in the bilingual dictionary. Cf. “How Rules are Applied”.
The short answer is don’t output it. In other words, don’t declare that it should be outputted into the target data stream.
When you match two or more words in the pattern section of a transfer rule, you can choose to only list some of the words in the output section. This is exactly what we did in “Step 1” of the tutorial. In (60) we only declared that the word in position 1 should be outputted.
Naturally to add something to the target output, we need to add something to the output part of our transfer rule. And what goes in output part the of our transfer rule? Lexical units. We need to insert a lexical unit block under the output element of our transfer rule. The bare minimum we need for a lexical unit is the word-sense and the grammatical category. If we are manually outputting a word-sense, we need to use a literal string element and the text needs to be of the form word1.2. Where 1 would be the homograph number (if there isn’t one in FLEx, use 1) and 2 would be the sense number - in this case the second sense of the word. (96) shows how it might look.
Of course you can output affixes or clitics as well. These would be additional literal string elements. Remember the first literal tag is the grammatical category, all subsequent tags are affixes and the like. If you have a valid word-sense and its corresponding grammatical category, FLExTrans will look up this word-sense in the target FLEx lexicon and use it in the final synthesis process.
If you have other lexical units that you will be outputting, remember to put a blank space element so that you get a space between your words. This is shown in (75). “Step 4” of the transfer rules tutorial shows an example of inserting a word into the target output.
There are two methods for deleting an affix. You can either set the value for that affix (attribute) to blank or you can not declare that the affix (attribute) gets outputted.

In the transfer rules you have the ability to use conditional logic. Please watch this video for an explanation. Some conditional logic can be automatically created for you using the Rule Assistant. See Section 4.7. Also see examples of conditional logic in the sample rule called: Sample logic to copy and paste or in the file transfer_rules-Sample1.t1x.
In the transfer rules you have the ability to modularize your rules by putting repeated logic into a macro. Please watch this video for an explanation.
One main strategy for getting words to agree with a noun, is to make sure features are assigned to the noun and then in the transfer rules make the needed adjustment to the words you output depending on what the feature values (or class values) are. You can use the Rule Assistant to do this. See Section 4.7.
If you can't use the Rule Assistant for some reason and you want to see how to do this ‘manually’ in a sample language pair, please watch this video.
If you would like to try creating the rules along with the video, please follow the instructions in the file: Readme.txt in the FLExTrans\FLExTrans Documentation\Agreement folder. See the file transfer_rules - solution.t1x which shows the form of the rules shown in the video.
Each sample logic block starts with a comment shown in yellow. Read through each of the most outdented comments to see what kind of logic matches your need. When you find one, click on the first black word under the comment. That will select the block (outlined in red). Now you can copy that block and put it into your own rule. There's also a file called transfer_rules-Sample1.t1x you can copy and paste from that rule file as well.
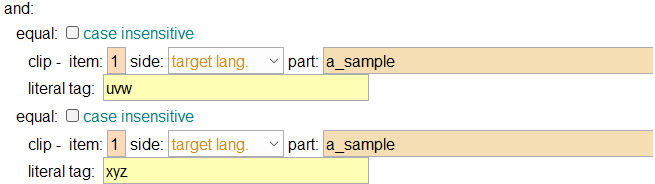
Inside of a test element you normally have an equal element. This allows you to see if x is equal to y. But if you want to test to see if two things are true, you can use the and element and then list two equal elements. The easiest way to bring this element into your rule is to copy an and element from the Sample logic rule or from the transfer_rules-Sample1.t1x file.
Inside of a let element you normally copy the value of the second element to the first element. See 8.2.7, method 1 for an example. With this element you can add to the end of the first element whatever is in the second element. For lemmas and literal strings this is straightforward. For example, you could append 1.1 to the end of praise to end up with the value praise1.1. For tags this is little different. You can't use append to add on to a tag, you can only use it to add a second tag. You could add the tag pl after the tag 3 so that there is now two tags 3 and pl. You can't create a combined tag of 3pl this way.[13] The easiest way to produce this element is to simply use the Insert command, to put it into your rule.
Note: you can append multiple things to your primary element. Just add more elements under append to.
Inside of a test element you normally have an equal element. This allows you to see if x is equal to y. But if you want to test to see if something begins with a certain value, you can use the begins with element and then list two elements. The first element is the thing you are checking. The second element contains what you want the first element to begin with. The easiest way to bring this element into your rule is to copy a begins with element from the Sample logic rule or from the transfer_rules-Sample1.t1x file.
Inside of a test element you normally have an equal element. This allows you to see if x is equal to y. But if you want to test to see if something begins with a certain value, you can use the begins with something in list element and then list two elements. The first element is the thing you are checking. The second element contains the name of a list. The text to match can be anything in the given list. Typically, the first element is "lem" and the things in the list are lemmas. Note: if you want to match an attribute, then the things in the list have to be surrounded by angle brackets. E.g. <PL>. The list has to be defined separately in the Lists section of the rules file. The easiest way to bring this element into your rule is to copy a begins with something in list element from the Sample logic rule or from the transfer_rules-Sample1.t1x file.
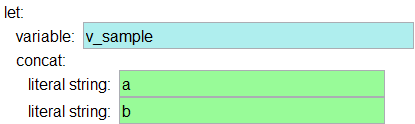
This element concatenates two or more things together, with the example below giving an end result of v_sample = ab.
The same thing regarding tags and literal strings as discussed in 8.2.12.2 applies.
Inside of a test element you normally have an equal element. This allows you to see if x is equal to y. But if you want to test to see if something ends with a certain value, you can use the contains substring element and then list two elements. The first element is the thing you are checking. The second element contains what you want to find in the first element. The easiest way to bring this element into your rule is to copy a contains substring element from the Sample logic rule or from the transfer_rules-Sample1.t1x file.
Not needed. See 8.2.12.10 or 8.2.12.12.
Inside of a test element you normally have an equal element. This allows you to see if x is equal to y. But if you want to test to see if something ends with a certain value, you can use the begins with element and then list two elements. The first element is the thing you are checking. The second element contains what you want the first element to end with. The easiest way to bring this element into your rule is to copy a begins with element from the Sample logic rule or from the transfer_rules-Sample1.t1x file.
Inside of a test element you normally have an equal element. This allows you to see if x is equal to y. But if you want to test to see if something ends with a certain value, you can use the ends with something in list element and then list two elements. The first element is the thing you are checking. The second element contains the name of a list. The text to match can be anything in the given list. Typically, the first element is "lem" and the things in the list are lemmas. Note: if you want to match an attribute, then the things in the list have to be surrounded by angle brackets. E.g. <PL>. The list has to be defined separately in the Lists section of the rules file. The easiest way to bring this element into your rule is to copy a ends with something in list element from the Sample logic rule or from the transfer_rules-Sample1.t1x file.
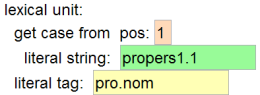
This element lets you change the case of something. It as the same function as the modify case element. But it helps you save the step of having to call modify case as a separate step. As you are using some piece of data, you can wrap this element around it to on-the-fly change its case. So instead of (111) as a separate step, could you use this element as in (108) to output the lemma for item 1, making it's case the same as item 2.
The easiest way to produce this element is to highlight an element such as clip or variable and then use the Wrap command to wrap an element around it and choose get-case-from.
Inside of a test element you normally have an equal element. This allows you to see if x is equal to y. But if you want to test to see if a value matches something in a list, you can use the in list element and then list two elements. The first element is the thing you are checking. The second element contains the name of a list. The logic will be true if the first element match anything in the given list. Typically, the first element is "lem" and the things in the list are lemmas. Note: if you want to match an attribute, then the things in the list have to be surrounded by angle brackets. E.g. <PL>. The list has to be defined separately in the Lists section of the rules file. The easiest way to bring this element into your rule is to copy an in list element from the Sample logic rule or from the transfer_rules-Sample1.t1x file.
This element lets you change the case of something. Under modify case you have two elements. The first element is the thing that you want to change. The second element instructs the rule engine what kind of case to give it. You can use a literal string to intentionally change it to a certain case. See (110). Aa will change it to have the first letter capitalized. aa will change it to lower case. AA will change it to upper case. Or you can have it copy the case of a value that already exists. In (111) the case of the lemma of item 1 will be set to be the same case as the lemma of item 2.
The easiest way to produce this element is to simply use the Insert command, to put it into your rule.
Inside of a test element you normally have an equal element. This allows you to see if x is equal to y. But if you want to test to see if x is not equal to y, you can use the not element and then list one equal element inside it. The easiest way to bring this element into your rule is to copy a not element from the Sample logic rule or from the transfer_rules-Sample1.t1x file.
Inside of a test element you normally have an equal element. This allows you to see if x is equal to y. But if you want to test to see if either one of two things is true, you can use the or element and then list two equal elements. The easiest way to bring this element into your rule is to copy an or element from the Sample logic rule or from the transfer_rules-Sample1.t1x file.
You can view the bilingual lexicon by double-clicking on the file bilingual.dix in the Output folder or click on the View Bilingual Lexicon button in the Live Rule Tester Tool. An example portion of a bilingual lexicon is shown in (114).
To test whether a Target Project is set up so the words in a specific text will synthesize correctly (without worrying about the source project or transfer rules), do the following:
You can handle this by using the Replacement Dictionary Editor to add additional mappings to the bilingual lexicon.
The bilingual lexicon is a mapping of source word-senses to target word-senses. There are no inflectional affixes present in the bilingual lexicon. That's the way FLExTrans builds it. In theory, though, there could be inflectional features or classes present. An example portion of a bilingual lexicon is shown in (115). You can view the bilingual lexicon by double-clicking on the file bilingual.dix in the Output folder or click on the View Bilingual Lexicon button in the Live Rule Tester Tool.
In order to have a word map differently than what is in the bilingual lexicon, you need to add a new line to the replacement dictionary. See “The Replacement Dictionary Editor”.
To learn how FLExTrans can handle these kind of variants, please watch this video.
The key thing in the techniques explained in the videos is to get inflectional features assigned to Irregularly Inflected Form variants that match exactly the suffixes that would normally be used.
If you would like to try doing the same thing while watching the video, please follow the instructions in the file: Readme.txt in the FLExTrans\FLExTrans Documentation\Irregular Form folder.
To learn how FLExTrans can handle these kind of variants, please watch this video.
The key thing in the techniques explained in the videos is to get inflectional features assigned to Irregularly Inflected Form variants that match exactly the suffixes that would normally be used.
If you would like to try doing the same thing while watching the video, please follow the instructions in the file: Readme.txt in the FLExTrans\FLExTrans Documentation\Irregular Form folder. Note: be sure to set the Source Text Name property in the FLExTrans Settings to Text2.
A phrasal verb is a verb that consists of two or more words. Often there is a verbal component and a non-verbal component. This discussion assumes that a verbal component is present.
If the source and target language both use a phrasal verb for a verbal concept and the non-verbal component(s) and verbal component individually match between the languages, you have nothing to worry about. Just link each component sense in the source to appropriate target sense.
If you have a situation where there isn't a match, there are steps you can take to have FLExTrans translate correctly. Let's take each situation in turn.
In this case you want to link the entire source phrasal verb to the one-word target verb. Here are the steps:
Now the source phrasal verb will correctly translate to the target verb.
In this case you want to link the one-word source verb to the entire target phrasal verb. Here are the steps:
Now the source verb will correctly translate to the target phrasal verb.
In this case you want to link the source phrasal verb to the target phrasal verb. Follow the first 3 steps in 8.3.6.1 and 8.3.6.2, link the verbs and the source phrasal verb will now translate to the target phrasal verb.
There is a FLEx module called Link All Senses As Duplicate. This module is ideal when you duplicate one FLEx project to be another one. In such a situation all the sense ids are exactly the same so it can be a big head start to link all source senses to their matches in the target project. The end result is that you will have a link for every source sense to every corresponding target sense. To add this module to your Tools collection in the FLExTools app, see Section 3.3.
One of the first things to do if you are getting synthesis errors is to put a word that is failing into the Try A Word window in the target FLEx project and see if it parses. If it doesn’t parse in FLEx, then don’t expect it to synthesize in FLExTrans. Figure out why it is not parsing in FLEx and then try synthesis again in FLExTrans.
There’s a check box in the Live Rule Tester Tool labelled Trace HermitCrab synthesis. When this is checked and you click the Synthesize button, the Live Rule Tester Tool will open a browser window showing a trace of what happened in the synthesis. This is similar to the output you see when tracing with Try A Word in FLEx.
The following is a list of various errors you may see in the Live Rule Tester tool or in the final synthesized text.
| (116) |
|
If a rule doesn't appear to be working, first check to see that the rule is listed in the Rule Execution Information area. If not, there is a problem with the category definition. Check your category definition to make sure it correctly matches the incoming data.
From version 3.14 of FLExTrans, it has been possible to install FLExTrans with a choice of user interface language. The following components will be localized:
button labels, module descriptions, collection names, error messages, XMLmind XML Editor labels for elements in the transfer rules, sample transfer rule comments, the FLExTools interface.
If FLExTrans has been installed in one language, and it is now required to change the user interface language to a different language, there are the following possibilities:
If the initially chosen installation language was English, and it is now required to change from English to a different language, the software should just be reinstalled, choosing the required language.
If the initially chosen installation language was not English, and another language is now required, the Collections ini files should first be manually deleted. The Collections ini files are found in the WorkProjects\{ProjectName}\Config\Collections folder, and all of the files in that folder should be deleted. After that, the software should be reinstalled, choosing the required language.
It is possible to change the user interface language of XMLmind XML Editor from English to French, Spanish, Chinese or various other languages.
The instructions below are modified from the XLingPaper webpage:
The default user interface for XMLmind XML Editor is in English. To use one of these non-English versions of the user interface, do the following steps:
You should now see the menu items using the language you chose. Please note that these non-English versions are for the user interface only. The attribute names and some of the validity messages will still be in English. Also the user documentation files are only in English.
If the FLExTrans user interface has been changed to a non-English language that XMLmind XML Editor also supports, then the element names will be translated into the chosen language, otherwise they will remain in English.
Note that for XLingPaper, which is a separate add-on to XMLmind XML Editor, there are only translations available in English, French and Spanish.
Production Mode is intended to be used after FLExTrans has the transfer rules set up. The interface is intentionally more simple, with only one collection that contains three modules. The modules cover importing the text from Paratext, linking the senses between the two Fieldworks databases, and translating the text.
The 'Translate Text' module contains the following modules: 'Extract Source Text', 'Build Bilingual Lexicon', 'Run Apertium', 'Catalog Target Affixes', 'Convert to Synthesizer Format', 'Synthesize Text (HermitCrab or STAMP)', and either 'Export to Paratext' or 'Insert Target Text' depending on the 'Production Mode Output Destination' setting in the FLExTrans Settings dialog.
The Production Mode interface looks like this:

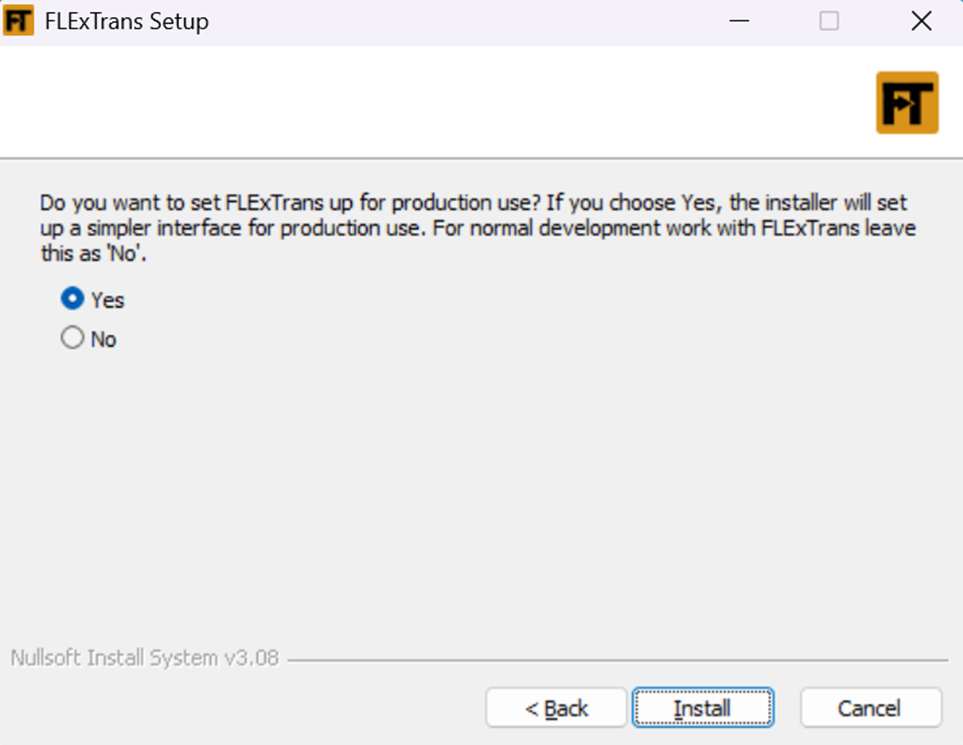
When installing FLExTrans to use Production Mode, ensure to choose the correct option:
It may be required to change from Production Mode to Normal Development Mode. In order to do this, the user should add the default Collections of Drafting, Run Testbed and Tools, see section 3.3. Other Collections may be added, as required.
The first version of FLExTrans was produced as part of a Master’s Thesis see Lockwood (2015). In 2018 and 2021 Ron presented papers about FLExTrans at the respective BT Conferences. See Lockwood (2018) and Lockwood (2021a). Also in 2021 Ron presented on Syntactic Parsing as a front-end to FLExTrans. See Lockwood (2021b).
Here are the steps:
The Apertium data stream format consists of one or more lexical units. In FLExTrans, a lexical unit looks something like this:
Where take1[17] is the headword from FLEx. The 1.1 subscript means homograph one, sense one. The grammatical category is colored in blue and all other tags are colored in green.
Endnotes
| [1] |
FLExTools is a general purpose program for running python scripts against a FLEx database. |
||
| [2] |
You may choose a different name for the custom field, but you also have to update the FLExTrans Settings to match the name. The name Target Equivalent is already defined in the settings that get installed with FLExTrans. |
||
| [3] |
The text will be taken from the Target Output Synthesis File as defined in the settings. This is the file created by the Synthesize Text module. |
||
| [4] |
Previously, you had to add a separate module to your collections, but that is no longer necessary. If you have the Fix Up Synthesis Text module in your Drafting or Testbed collections, you should remove them. |
||
| [5] |
For this tutorial I am basically reproducing the Apertium article A long introduction to transfer rules. I am mainly modifying it to show the XMLmind XML Editor method of editing the transfer rules, but also the FLExTrans process is assumed instead of the Apertium process. |
||
| [6] |
The 1 in .t1x stands for the first structural transfer pass. This is the only file we worry about when doing a shallow-transfer system. For advanced-transfer, you use three rule files, and the extensions .t2x and .t3x are also used. |
||
| [7] |
You would see this if you use the View Source/Target Apertium File Tool. It is the friendly view of the file source_text-aper.txt in the Build folder. The actual content looks like this: ^Otići1.1<v><pfv><ptcp_f_sg>$ ^biti1.1<cop><prs><sg><2>$ ^tiho1.1<adv>$ ^i1.1<coordconn>$ ^bez1.1<prep>$ ^pozdrav1.1<n><gen_sg>$ |
||
| [8] |
You would see this if you use the View Source/Target Apertium File Tool and click the Target button. It is the friendly view of the file target_text-aper.txt in the Output folder. The actual content looks like this: ^Leave1.1<v><pfv><ptcp_f_sg>$ ^be1.1<cop><prs><sg><2>$ ^quietly1.1<adv>$ ^and1.1<coordconn>$ ^without1.1<prep>$ ^word1.1<n><gen_sg>$ |
||
| [9] |
pst corresponds to the past suffix in the English FLEx project (and also the past tense feature). |
||
| [10] |
It can be arduous to type in all the grammatical categories that you need for your transfer rules. That’s why there is the FLExTrans tool called Set Up Transfer Rule Grammatical Categories. This tool will insert all possible source and target categories for the a_gram_cat attribute. See section 4.5 for more details. |
||
| [11] |
In our target_text.txt file it puts a ^ and $ before and after the contents contained within it. |
||
| [12] |
In our target_text.txt file each tag starts with a <, ends with a >. |
||
| [13] |
You could achieve this by taking a literal string with a value of 3 and appending another literal string with a value of pl. But you couldn't start with a tag that has a value of 3. This is because under the hood, the value of a tag includes the angle brackets. Tag 3 is actually <3>. |
||
| [14] |
You can right-click on a component word and select Move Left or Move Right. |
||
| [15] |
You can use the View Source/Target Apertium File Tool for a more friendly view of the data stream format found in the files source_text.txt and target_text.txt. |
||
| [16] |
In the plain format the stream format can be explained as follows:
|
||
| [17] |
Technically FLEx only displays a subscript 1 if there is a homograph that exists with subscript 2. Without any homograph the FLEx headword is just plain -- without any subscript. |
References
Apertium. 2021. Apertium, A free/open-source machine translation platform. (http://apertium.org) (accessed 12/20/2021).
Black, H. Andrew. 2014. A Conceptual Introduction to Morphological Parsing for Stage 1 of the Fieldworks Language Explorer. SIL International Manuscript.
Forcada, Mikel L., Bonev, Boyan Ivanov, Rojas, Sergio Ortiz, Ortiz, Juan Antonio Perez, Sanchez, Gema Ramirez, Martinez, Felipe Sanchez, Armentano-Oller, Carme, Montava, Marco A., Tyers, Francis M. 2010. Documentation of the Open-Source Shallow-Transfer Machine Translation Platform Apertium. Departament de Llenguatges i Sistemes Informàtics Universitat d’Alacant Manuscript. (https://wiki.apertium.org/wiki/File:Apertium2-documentation.pdf).
Lockwood, Ronald Milton. 2015. A Linguist-Friendly Machine Translation System for Low-Resource Languages. University of Washington Manuscript. (https://digital.lib.washington.edu/researchworks/handle/1773/33999).
Lockwood, Ron. 2018. Linguistically-Based Machine Translation with the New Tool FLExTrans. In . Proceedings of Bible Translation 2017 Conference. pages unknown. Dallas.
Lockwood, Ron. 2021a. Results of Machine Translation with FLExTrans in Production-Mode. In BTConf2021, , pages unknown.
Lockwood, Ron. 2021b. Using Syntactic Parsing to Enable Machine Translation for Language Pairs with Thorny Differences. In BTConf2021, , pages unknown.
Bible Translation Conference 2021. 2021. Proceedings of Bible Translation 2021 Conference. Online.