Map Creator Maps
Complete guide for working with MAPX files
Note: These instructions precede Paratext Diagram Labeler’s support for directly generating MAPX files pre-filled with your labels. The instructions relating to creating the file and importing translations are relevant only if you choose to go that route.
Create the localized Map Creator file (if not generated by Paratext Diagram Labeler)
- Find the appropriate downloaded .mapx file for the map(s) you wish to prepare.
- Copy the file to the project’s \local\figures folder. We recommend following the naming convention of the generated merge files. If the original was named e.g.
245wbt -Seven Churches.mapx, and your Paratext project was e.g.Zezi, your map file would be245wbt - Seven Churches @Zezi.mapx. - Open the .mapx file with Map Creator.
- Go to File > Import > Translation Data. Browse to the .txt file that was exported from the SIL Map & Illustration Repository.
- On the “Ready to import translations” just click Finish.
- If all goes well, you will see “Import complete.” The import process does, however, show conflicts with any previously imported translations for your project language. These will have to be resolved in consultation with your team.
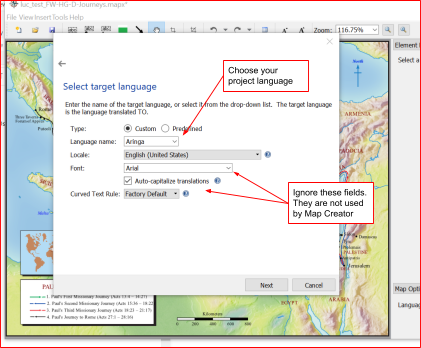
- Finalize your translated map.
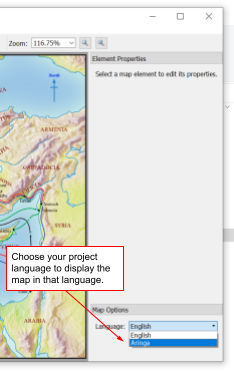
- Don’t be surprised that your map will look exactly the same after the import! Go to the Language drop down under Map Options and choose your project language. Only then will your translated map appear.
- Adjust location and other properties of text fields. There are many options! (Typesetters unfamiliar with Map Creator can profit from an excellent tutorial video here. For excellent support, email help@fmosoft.org.) Any fields still displaying English within parentheses indicate missing translations, i.e. a blank verse in the corresponding Paratext XX Book chapter. (Note: It could also indicate a mismatch between the English name expected on the map and the English name in the translation data file, in which case, please report it to maps-illustrationsrepository_intl@sil.org.)
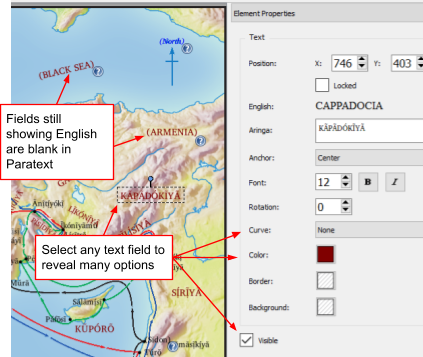
- For any label that says “OMIT” or contains only dashes, select it and uncheck the “Visible” checkbox. This should hide both the label and any associated city dot.
Bringing a Map Creator map into a Scripture publication
- PDFs and jpegs can be created in Map Creator via File > Export
- PDFs of Map Creator maps should be placed directly into InDesign Scripture documents. Publishing Assistant should automatically place any map which has been formatted in Paratext using the \fig markup and is located in the Paratext project’s local/figures folder. Occasionally, you may still see the jpg being placed instead of your .pdf. The best way to fix this is to use the Text Editor in InDesign (ctrl-y) to edit the fig markup and change the filename to have the .pdf extension. Then use PubAssist to place the picture again.
- When pictures are placed directly in the Scripture text, they should have the title field turned off (un-tick visible) and the title should be included instead in the caption and reference sections of the Paratext markup as appropriate. Revisit all the maps after final validation to make sure they (and the gutter rule) still look ok.
Attribution Required for Using Map Creator
Note that if you use Map Creator even with maps/diagrams that did not originate from Map Creator, you are required to follow the attribution rules below, in addition to any attribution rules that may apply to the source of the maps/diagrams.
Attribution Rules
Publications that include material disseminated by Map Creator or produced using Map Creator must include this credit:
“Maps [and diagrams and charts] [on pages ___] are produced with Map Creator software from fmosoft.com. Used by permission. All rights reserved.”
More Information
- Home Page: https://fmosoft.com/map-creator
- Intro Video: https://vimeo.com/59357958