InDesign Maps
Guide for typesetting with IDML files
Note: These instructions precede Paratext Diagram Labeler’s support for directly generating IDML files pre-filled with your labels. The instructions relating to doing a data merge are relevant only if you choose to go that route.
Using InDesign Data Merge – Create the InDesign file
- For the map you wish to typeset, open the corresponding InDesign file. (If you downloaded the expanded edition of the repository, open the version that does NOT have “@en” or other language code as part of the filename.)
Note: All maps are distributed as .idml files instead of the usual .indd because this format is supported back to CS4.
All artwork is embedded directly in the .idml file.
- If your maps use a Roman-based writing system, all you’ll need to do is ensure that the Charis SIL and Andika fonts are installed on your system. If you receive a message that you have missing fonts, simply install the versions of these fonts that can be found in the “Document fonts” subfolder in the top level of “SIL Maps Repository”.
- Many of these InDesign maps support multiple options within one IDML file, most often the map type (such as “full color relief” or “black & white flat”) and sometimes other variations (such as “complex routes” vs “simple routes” on the Exodus map). You can manually toggle layers to get the variation you’re wanting. Note that some paragraph styles like “Ocean” and “Region” use color swatches named “Water color” and “Region color”, and if you’re wanting a black & white map, you’ll need to change these paragraph styles to use the swatches named “Water BW” and “Region BW” instead.
However, there’s a better option: You can install the MapMonkey script, and run this whenever you want to “monkey” with the map options, either before or after the data merge. For example, you might want a black & white map for your print publication, but the color version of it for your Scripture app. For more information, see the MapMonkey for InDesign page. - If your maps use a non-Roman writing system, you will need to ensure that the definitions of the
font1andfont2paragraphs styles specify the font and any other properties that are required for proper rendering. All styles used for labels inherit the writing system properties from these two styles.- Example: For a map that uses Devanagari script and Western digits, in the
font1andfont2paragraph styles, set the font to Annapurna SIL, set the justification to “Adobe World-Ready Paragraph Composer”, and set the language to “Hindi”.
Alternatively, for this particular case, you may simply import these paragraph definitions from theDeva_AnnapurnaSIL_WesternDigits.inddfile which can be found in the!Stylesfolder at the root of the map repository. - If the fonts that you are using do not have native bold and/or italic faces, you will need to edit the respective paragraphs styles (e.g.
font1 bold italic) to fake the face appropriately, such as by adding a very slight outer stroke to fake bold, and/or skew for italics. - The
Regionsparagraph style typically employs expanded tracking in Roman-script projects, but the amount of expansion may be inappropriate in other writing systems. For this reason, you can modify theexpandedcharacter style to set an appropriate tracking property. - If your writing system uses a numeral system supported natively by InDesign, (that is, Bengali, Burmese, Devanagari, Farsi, Full Farsi, Gujarati, Gurmukhi, Eastern Arabic [“Hindi”], Kannada, Khmer, Lao, Malayalam, Oriya, Tamil, Telugu, Thai, or Tibetan), it will not be necessary to manually replace the Western digits on the map (such as for the scale) with local digits. InDesign can render the normal digit characters (codepoints U+0030 to U+0039) as if they were in various other numeral systems, without needing to replace the actual numerical characters. The
!AllDigitStyles.inddfile (which can likewise be found in the!Stylesfolder) contains a paragraph style for each of these numeral systems. By loading a style from that document into your map, and basing a style in that document on this style, you can control the digit system that InDesign uses to render normal digits.- For example, for a map that uses Devanagari script and Devanagari digits, import the
devanagari digitsparagraph style into your map from the!AllDigitStyles.inddfile, and then base the definition offont1andfont2on this paragraph style.Alternatively, for this particular case, you could import all paragraph styles from the
Deva_AnnapurnaSIL_DevaDigits.inddfile into your map.
- For example, for a map that uses Devanagari script and Devanagari digits, import the
- Once you have set up your
font1andfont2styles appropriately for your writing system, save a copy of this document to be used as the import source for all maps. If it could be helpful for other typesetters who may use the same writing system, please contact the repository manager via the Contact page, and provide a sharing link to the file you’d like to contribute to the repository. Thank you!
- Example: For a map that uses Devanagari script and Western digits, in the
- If you have all the needed fonts installed on your computer but you are still seeing a pink highlight behind your text, that is an indication that your font is still missing. Check to make sure there are no Character Styles applied. Removing them should fix your issue.
- Open the Layers panel (Windows/Layers). This panel provides a number of customization possibilities, so explore it thoroughly. There is often a layer titled “Map Choices”. Click the > symbol to the left to view the variations. Toggle the layer’s visibility by clicking on the eyeball symbol.
- If you choose a map that has a black & white layer available, you can either apply the bw version of the styles to the appropriate layers or redefine the “
Regions“, “Water“, “Ocean“, and “Seas” paragraph styles to use the “BW” versions of the color swatches. (e.g. Edit the style, and under Character Color, instead of the “Region color” swatch, select the “Region BW” swatch.) Better yet, use the MapMonkey tool to automate this process.
Using InDesign Merge – Data Merging
- Open the repository map (.idml), and save a copy to work from in .indd format. We recommend saving the file in the project \local\figures directory and adding the project name to the filename. The traditional option is to prefix the project name to the filename. (e.g.
zezi_155wbt - Holy Land.indd) Alternatively, you can append it after an “@” symbol (e.g.155wbt - Holy Land @Zezi.idml). As this matches the pattern of the samples map filenames, this can simplify automatic substitution of sample placeholders with the actual map file at typesetting time using a changes.txt rule. - Go to the InDesign menu item “Window” and navigate to “Utilities”. Choose “Data Merge” from the fly-out menu. Go to the Panel Menu icon (stacked horizontal lines in the upper right corner of the Data Merge panel)
 and choose “Select Data Source.”
- Open the repository map (.idml), and save a copy to work from in .indd format. We recommend saving the file in the project \local\figures directory and adding the project name to the filename. The traditional option is to prefix the project name to the filename. (e.g.
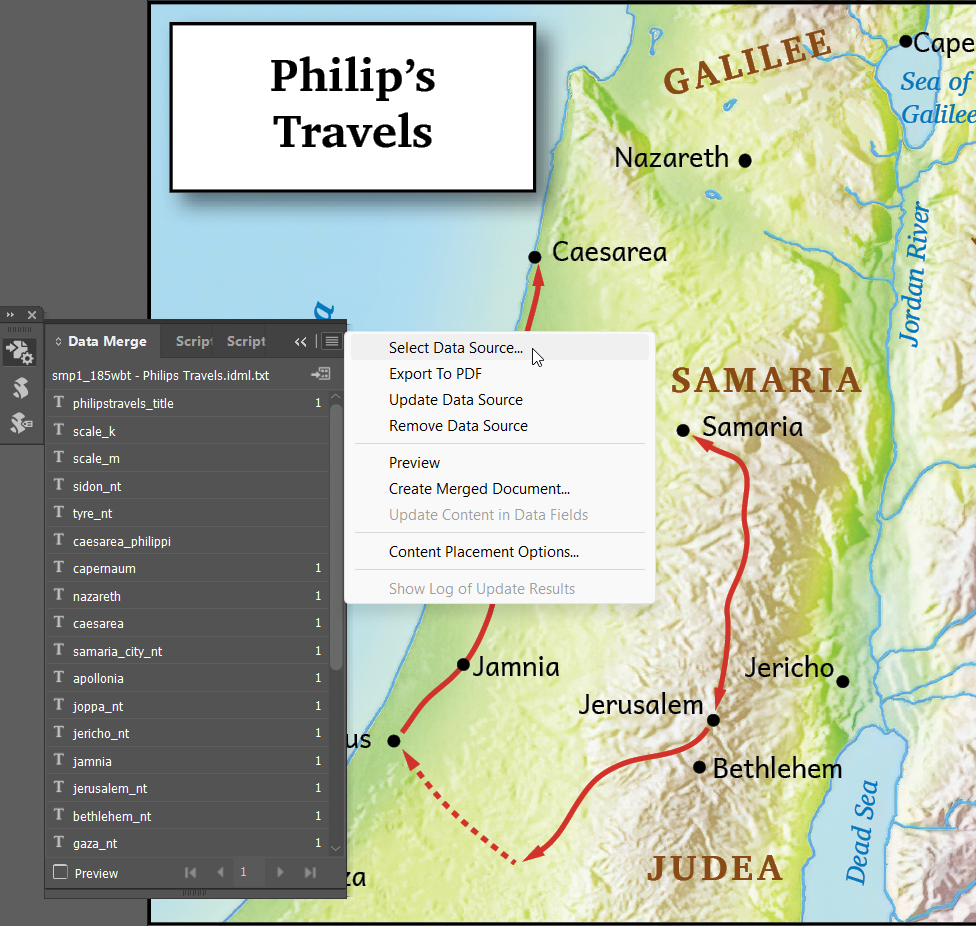
- InDesign may warn you, “Changing to a new data source may make the inserted data fields invalid. You may have to insert the placeholders again.” Click “OK” to proceed.
- If you (or the translation team) used Paratext Diagram Labeler and exported the data merge files to the default location, you’ll find them in Paratext Project’s \shared\labeler folder. For example,
155wbt - Holy Land @Zezi.idml.txtThe list should populate the Data Merge panel. (If you used Scripture Map Labeler instead, see its accompanying documentation for details on data merge filenames and locations.)
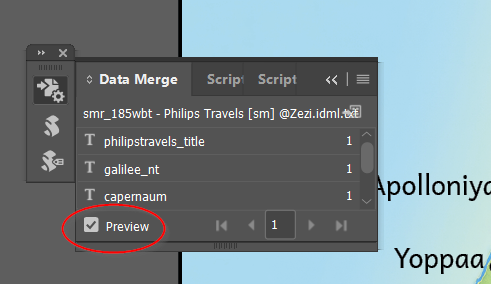
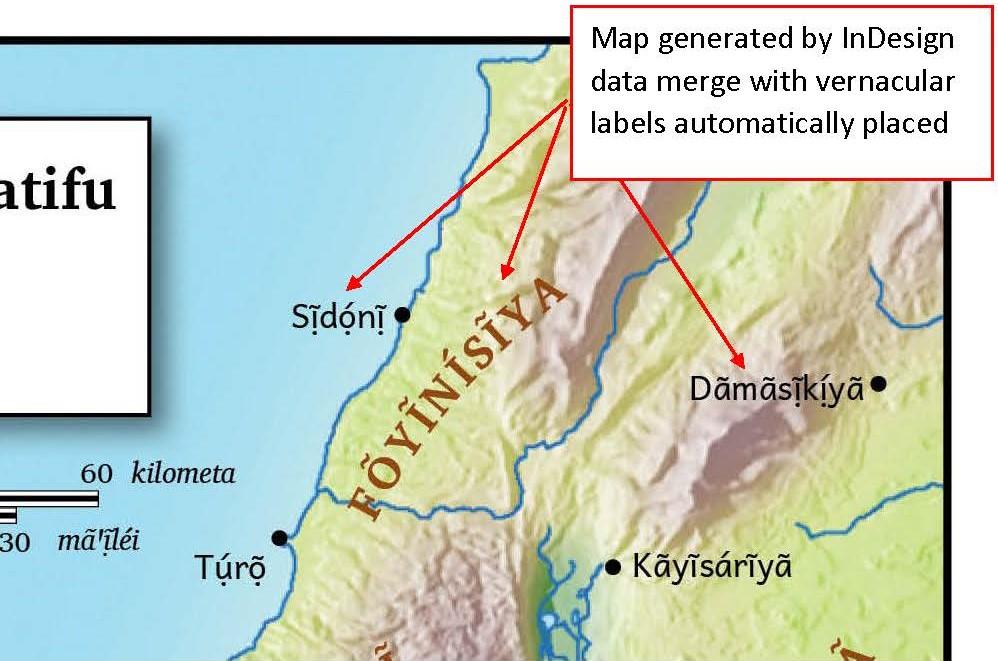
Enable “Preview” mode by checking the box in the lower left corner of the Data Merge panel. Then you should see the labels in your language rather than the original English labels or the field names enclosed in <<angle brackets>>.
- Continuing to work in preview mode, adjust your map as follows:
First of all, especially if you are using a non-Roman writing system, check that everything is rendering correctly. On your first map, you may need to make the changes to the font1 and font2 paragraph styles as described above in step 4 of “Using InDesign Data Merge – Create the InDesign file”. On successive maps, you should be able to simply import these paragraph styles from your first map file. (From the Paragraph Styles panel, click the menu icon in the upper right corner and choose “Load All Text Styles…”)
Next, select the map options you want. This is the time to call on the MapMonkey if you have it installed.
After this, check for overset text. This is text that does not fit within its text box. Most text frames are set to “Auto Size” appropriately, but some labels may need to be resized. Overset text boxes are indicated with a red “+” symbol in the lower right corner of the text box.
Using the Selection tool (top arrow in the toolbox), any such text frames can be selected and resized as needed. You can also check for overset text by looking at the Preflight Panel indicator at the bottom of your InDesign window:
 Reposition any text boxes as needed. You can adjust the font size of an individual entry or change the paragraph style so that you adjust the size of all of the “cities”, for example. Either can be appropriate at different times.
Any fields that contain only dashes/hyphens (or filled with the word “OMIT”) are fields that the translators intend to be omitted. Hide these labels, so that they don’t appear in the final output, by un-ticking the eyeball for that item in the Layers panel. Likewise, hide any corresponding information (like the Mile scale) by un-ticking that layer. Removing dots for deliberately omitted cities is easy, as there is a separate InDesign object for each dot.
Now is the time – still in preview mode – to make any other cosmetic changes to the map, as needed by the current project. Bear in mind that you may need two different versions of the map: a black and white one for print and a color one for digital use.
The cosmetic changes in mind are changing the visibility of various layers, changing style attributes, and/or moving text labels. You should not make changes directly to the preview text, not even inserting a line break to wrap long text, as such changes will not be preserved when doing the data merge. Rather, if you need a long label to be wrapped, you should change the dimensions and/or other properties of the text frame and/or paragraph. E.g. Change the text frame’s object style to “multiline”. (Note that the paragraph’s “Balance Ragged Lines” setting, which affects wrapping, is turned on, as inherited from the font1 style.) It is recommended that you keep the Data Merge panel open so that InDesign will prevent you from mistakingly editing the preview text. Unless the Data Merge panel is open, the document will behave just like an already-merged document, with editable labels. (It will be possible AFTER step 6 in Repeating the Merge Cycle to edit the text and preserve the change, but it is hoped that little of that will be needed.)
Note that it is NOT necessary to use the Merge button and create a second, merged InDesign file at this point. If you save and export to jpg or to pdf with Preview mode turned on, the files will be quite usable at this point. We do recommend doing the final merge step and saving that file after you are certain the team will make no more label changes. (See Repeating the Merge Cycle below).
Saving your InDesign map file
Save the .indd file as described above.
If the Paratext project does not already contain a \fig field for this map/diagram, such as by doing “Insert Figure” with a sample image, or by the USFM representation of a diagram used by Paratext Diagram Labeler, you will need to create one now. First, export the map to a jpg file, and then use this file to insert \fig information into the Paratext Project at the appropriate locations. If you have editing privileges to the project, you can do this yourself or else share it with the team for them to do so. This will give you two map files in your project IDENTICALLY NAMED except for their extensions. First – a master copy file (.indd) containing all your edits and the original merge keys, which you will re-use for subsequent merges. Second, a (.jpg) file placed into the Paratext project.
Repeating the Merge Cycle
After each round of team proofing, there may be text and spelling changes that need to be re-merged into the project maps:
- Re-export the data merge files.
- For each affected map, open the master file copy (.indd) and “Update data source” on the Merge Tool menu.
- Save each revised map according to “Export Map Merge Files”, replacing the previous vernacular (.indd) file.
- When the team has fully approved the maps and no more map label changes are expected, you can complete the final step of “Merging” the document and creating a second InDesign file with the labels actually embedded in the file.
- Choose “Create Merged Document” from either the Panel Menu or the “Merge Data” icon located just below the Panel Options icon.
- The Create Merged Document dialogue box will open. The default settings will suffice; click OK when prompted. Note: While performing the Merge task, your merged data will appear to revert back to the generic data fields, but it is still there. Once the Data Merge is completed, a new InDesign file with a “-1” added to the name will be generated. We recommend your saving this file as an .idml file and removing the -1. That way the files are identically named and you have not overwritten your mergeable .indd file. The merged .idml file will preserve the data more safely for long term archiving.
Bringing an InDesign map into Scripture Publications
- InDesign maps (.indd files) should be placed directly into InDesign Scripture documents. Publishing Assistant should automatically place any map which has been formatted in Paratext using the \fig markup and is located in the Paratext project’s local/figures folder. Occasionally, you may still see the jpg being placed instead of your .indd. The best way to fix this is to ascertain the exact location of the \fig markup in Paratext and go to that location in the InDesign file. Edit the fig markup and change the filename to have the .indd extension. In PA6 jobs, you can find it using the Text Editor (ctrl-y). In PA7 jobs, figure markup is found in the Conditional Text Panel Menu. Make the “Hidden Illustration” text visible by clicking in the first column on that line, edit the markup, and turn off visibility again. In both cases, carefully verify that the hidden attributes apply to your new edits. Then use PubAssist to place the picture again.
- When maps are placed directly in the Scripture text, they should have the title layer turned off and the title should be included instead in the caption and reference sections of the Paratext markup as appropriate. Revisit all the maps after final validation to make sure they (and the gutter rule) still look ok.
- You may export the merged map to the jpg and PDF formats after final validation. The PDF is useful for archiving.
- When archiving the final publication files, make sure to archive the local/figures and shared/labeler folders as well.